



How to make an adorable ribbon candy garland with Bowdabra


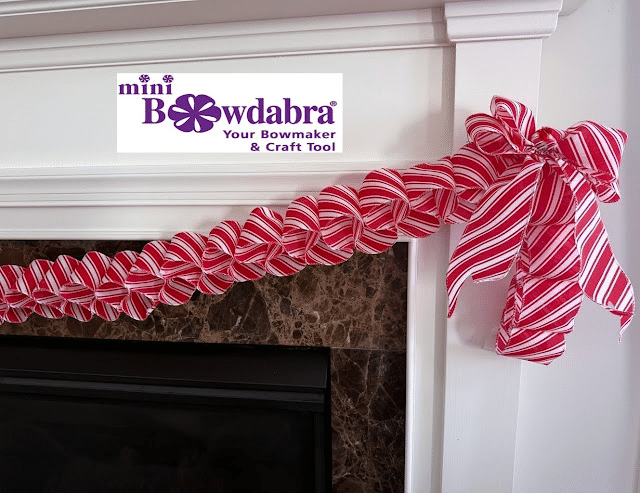
Transform your holiday decor with a handmade ribbon candy garland with Bowdabra bows. This adorable garland is designed to look like the old-fashioned hard ribbon candy I remember as a child. One that brings to mind wonderful Christmas memories! Designed to bring warmth, style, and festive cheer to your home! And it’s made with striped wired ribbon looped into a spiral shape ending with adorable Bowdabra bows – mimicking the look of red and white ribbon candies!
It’s definitely a super cute, charming accent for mantels, Christmas trees, holiday parties, or gift giving, that adds a festive touch wherever you need it! So let’s get started with how to make one!

Materials:


How to:

Begin by leaving the ribbon on the roll, adding fabric glue to the edge of the ribbon end to seal it and .  .  .

Place the glued end about 4 inches on the opposite side of the ribbon, pressing it down in place.

Then loosely take the ribbon around, creating a loop to where the back of the first loop is, gluing the two pieces together just below the curves.

Keep looping the ribbon up and down, gluing in place, and matching the glued areas 
(where the arrows are) until reaching the desired length.


See how nicely the looped ribbon looks. Doesn’t it remind you of a candy cane! I used parchment paper and clothespins/clips to hold the ribbon together until the glue dried.

Continue as before, until you’ve reached the desired length. This garland is 85″ long! 
How’s this for a ribbon candy cane!


Now it’s time to make adorable bows using the Mini Bowdabra!  First, insert an 
18″ piece of bow wire folded in half into the Mini Bowdabra, tucking ends under. Then take a 12″ strip of matching ribbon and pinch the ribbon in the middle and insert it down into the Mini Bowdabra for the bow tails.

Make the Bowdabra bow:

Dovetail the ends by folding each end together and cutting at an angle from the corner end over to the opposite fold at an angle.


Next, pinch the end of the ribbon on the roll, placing it down into the Mini Bowdabra.
Create a loop by folding over the ribbon at the 3″ mark on the ruler. Gather the ribbon and twist it to the right side down into the Mini Bowdabra, smoothing the ribbon out.
On the opposite side, fold over the ribbon at the 3″ mark. Create another loop, gather the ribbon, and twist to the right side down into the Mini Bowdabra.
Next, make another loop, folding over at the 2.5″ mark. Gather the ribbon and twist to the right side down into the Mini Bowdabra and .  .  .
making another 2.5″ loop on the opposite side for a total of four loops (two on each side).
Use the Mini Bowdabra wand to crunch down the bow.
Leave about two inches of ribbon for the finish center and crunch down the bow again to cut off excess ribbon.
While the bow is still in the Mini Bowdabra, thread the two loose ends of the bow wire through the loop. Pull tightly while gently pulling the bow out.
Adjust the center ribbon fabric into a decorative knot.
And then make another gorgeous Bowdabra Bow!
 Attach the bows to the ends of the garland using the Bowdabra bow wire!
 
And have fun decorating!

It’s never too early to start on your Holiday decor, and this ribbon candy garland is sure to be a hit. To view more of Bowdabra designer, Gail’s amazing crafts, visit her blog at Purple Hues and me!


Learn how to make a pinwheel hairbow in this quick

Bring autumn flair to your front door with this beautiful

Thanksgiving décor has a special kind of magic—rich textures, warm

Olivia of Pretty Palace Porches creates a large, beautiful Bowdabra

October is Breast Cancer Awareness Month. Show your support with

Hi everyone! It’s Nicole from Reed Family Farm and the

How to make an adorable ribbon candy garland with Bowdabra

How to make an adorable ribbon candy garland with Bowdabra


Transform your holiday decor with a handmade ribbon candy garland with Bowdabra bows. This adorable garland is designed to look like the old-fashioned hard ribbon candy I remember as a child. One that brings to mind wonderful Christmas memories! Designed to bring warmth, style, and festive cheer to your home! And it’s made with striped wired ribbon looped into a spiral shape ending with adorable Bowdabra bows – mimicking the look of red and white ribbon candies!
It’s definitely a super cute, charming accent for mantels, Christmas trees, holiday parties, or gift giving, that adds a festive touch wherever you need it! So let’s get started with how to make one!

Materials:


How to:

Begin by leaving the ribbon on the roll, adding fabric glue to the edge of the ribbon end to seal it and .  .  .

Place the glued end about 4 inches on the opposite side of the ribbon, pressing it down in place.

Then loosely take the ribbon around, creating a loop to where the back of the first loop is, gluing the two pieces together just below the curves.

Keep looping the ribbon up and down, gluing in place, and matching the glued areas 
(where the arrows are) until reaching the desired length.


See how nicely the looped ribbon looks. Doesn’t it remind you of a candy cane! I used parchment paper and clothespins/clips to hold the ribbon together until the glue dried.

Continue as before, until you’ve reached the desired length. This garland is 85″ long! 
How’s this for a ribbon candy cane!


Now it’s time to make adorable bows using the Mini Bowdabra!  First, insert an 
18″ piece of bow wire folded in half into the Mini Bowdabra, tucking ends under. Then take a 12″ strip of matching ribbon and pinch the ribbon in the middle and insert it down into the Mini Bowdabra for the bow tails.

Make the Bowdabra bow:

Dovetail the ends by folding each end together and cutting at an angle from the corner end over to the opposite fold at an angle.


Next, pinch the end of the ribbon on the roll, placing it down into the Mini Bowdabra.
Create a loop by folding over the ribbon at the 3″ mark on the ruler. Gather the ribbon and twist it to the right side down into the Mini Bowdabra, smoothing the ribbon out.
On the opposite side, fold over the ribbon at the 3″ mark. Create another loop, gather the ribbon, and twist to the right side down into the Mini Bowdabra.
Next, make another loop, folding over at the 2.5″ mark. Gather the ribbon and twist to the right side down into the Mini Bowdabra and .  .  .
making another 2.5″ loop on the opposite side for a total of four loops (two on each side).
Use the Mini Bowdabra wand to crunch down the bow.
Leave about two inches of ribbon for the finish center and crunch down the bow again to cut off excess ribbon.
While the bow is still in the Mini Bowdabra, thread the two loose ends of the bow wire through the loop. Pull tightly while gently pulling the bow out.
Adjust the center ribbon fabric into a decorative knot.
And then make another gorgeous Bowdabra Bow!
 Attach the bows to the ends of the garland using the Bowdabra bow wire!
 
And have fun decorating!

It’s never too early to start on your Holiday decor, and this ribbon candy garland is sure to be a hit. To view more of Bowdabra designer, Gail’s amazing crafts, visit her blog at Purple Hues and me!