

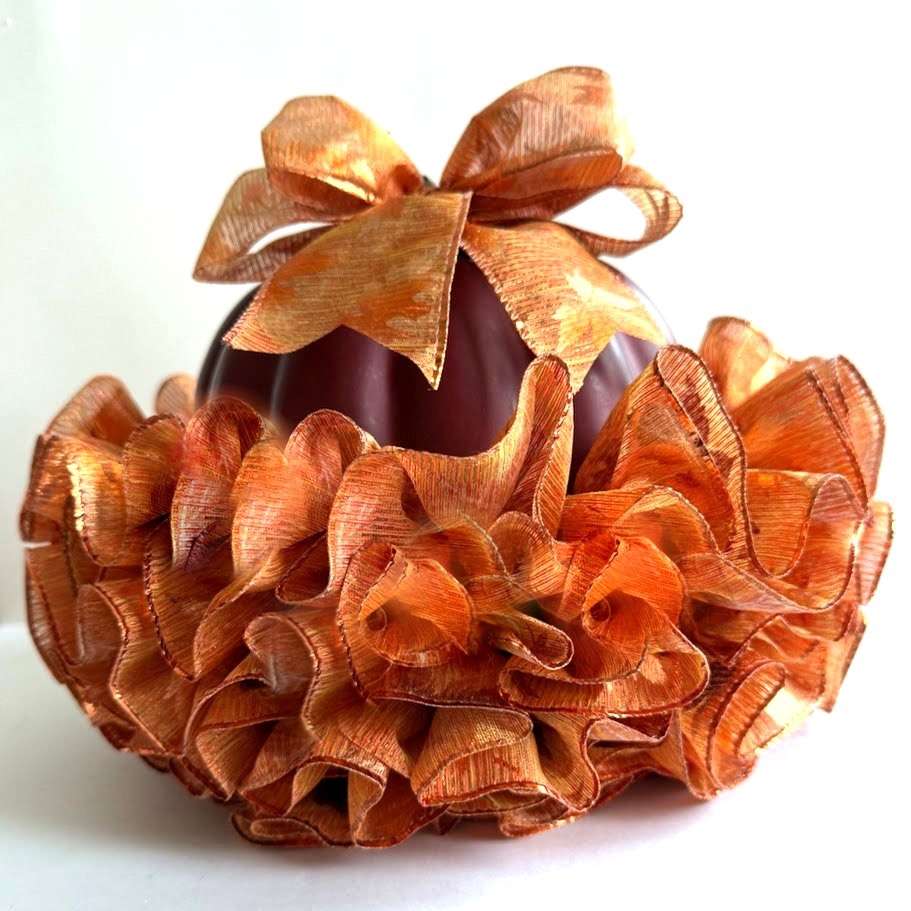
How to Make an Adorable Ruffle Ribbon Pumpkin and Bow


pumpkin and bow

Decorating for fall is a fun and effortless way to fill your home with cozy seasonal charm. Imagine using ruffled wired ribbon to decorate a faux pumpkin and bow with Bowdabra! It looks unique, adding a dramatic, festive feel to any autumn occasion! So let’s get started with making one!

Materials:

How To:

First, you will need lots of wired ribbon. I’m using a 50-yard roll from Costco. Leave the ribbon on the roll for now and pull out the wire from one end of the ribbon. Secure that end of the wire by wrapping it tightly around something – I’m using a plastic toothpick to wrap the wire around to keep it neatly together. 

To make the first ruffle, as I mentioned before, leave the wired ribbon on the roll. Begin gently pulling out the wire on one of the ribbon edges to create the ruffles, while pushing the ribbon fabric along the wire to form ruffles.

Continue pulling the wire out, gathering into ruffles. 


Lay the gathered ribbon on the pumpkin base to get an idea of how much it will take to go around the pumpkin before cutting the ribbon off.
I used straight pins to secure ruffles to the pumpkin. They were easy to use and better than using glue. Adjust the gathers evenly along the length of the ruffle until reaching the other end. 
Once you’re finished making the ruffle, I like to use a needle to thread the end wire on and then sew the wire into the top edge of the ribbon several times to secure the wire, and then cut off the excess. 
              
 
After securing the first row of ruffles, use a rubber band to mark where to place the next ruffle on the pumpkin and draw a line around the pumpkin with a marker pen. 
                     I’m really loving this ruffle ribbon pumpkin design!


pumpkin and bow
Continue making additional ruffle layers, gathering the ribbon and adding layers, to dress up the pumpkin.
pumpkin and bow

There are now five ruffle layers on the pumpkin! Time to make an adorable bow using the Mini Bowdabra to complete this lovely, whimsical look!

pumpkin and bow

Make the bow:

Let’s start by inserting an 18″ piece of bow wire folded in half into the Mini Bowdabra, tucking ends under.

Then take a 10″ strip of ribbon for the bow tails, pinching the ribbon in the middle and inserting it down into the Mini Bowdabra.

Next, dovetail the ends by folding each ribbon end together and cutting at an angle from the corner end up to the fold on the opposite side.

Next, pinch the end of the ribbon on the roll, placing it down into the Mini Bowdabra.

Create a bow loop by folding over the ribbon at the 3″ mark on the ruler and twisting the ribbon down into the Mini Bowdabra while smoothing the ribbon out.

On the opposite side, fold over the ribbon at the 3″ mark, creating another loop, twisting the ribbon down into the Mini Bowdabra.

Then make another loop, folding over at the 2.5″ mark, twisting the ribbon down into the Mini Bowdabra and .  .  .

making another 2.5″ loop on the opposite side for a total of four loops (two on each side). 

Use the Mini Bowdabra wand to crunch down the bow .  .  .

using scissors to cut off the excess ribbon. While the bow is still in the Mini Bowdabra, thread the two loose ends of the bow wire through the loop, pulling tightly while .  .  .


gently pulling the bow out.

pumpkin and bow

And finally, tie the bow around the pumpkin stem using the Bowdabra bow wire, and then fluff the bow and all of the ruffles for a  .  .  .

pumpkin and bow

Fabulous and gorgeous looking pumpkin and bow!
pumpkin and bow


This Halloween trick or treat bag brings the best of

Bring a little rustic autumn charm to your home with

Don’t throw away those leftover ribbon pieces! In this easy

  Create a fantastic Fall Wreath with NO hot glue!

Bring the beauty of fall to your home with this

There’s something about autumn colors—burnt orange, golden yellow, deep brown—that

How to Make an Adorable Ruffle Ribbon Pumpkin and Bow

How to Make an Adorable Ruffle Ribbon Pumpkin and Bow


pumpkin and bow

Decorating for fall is a fun and effortless way to fill your home with cozy seasonal charm. Imagine using ruffled wired ribbon to decorate a faux pumpkin and bow with Bowdabra! It looks unique, adding a dramatic, festive feel to any autumn occasion! So let’s get started with making one!

Materials:

How To:

First, you will need lots of wired ribbon. I’m using a 50-yard roll from Costco. Leave the ribbon on the roll for now and pull out the wire from one end of the ribbon. Secure that end of the wire by wrapping it tightly around something – I’m using a plastic toothpick to wrap the wire around to keep it neatly together. 

To make the first ruffle, as I mentioned before, leave the wired ribbon on the roll. Begin gently pulling out the wire on one of the ribbon edges to create the ruffles, while pushing the ribbon fabric along the wire to form ruffles.

Continue pulling the wire out, gathering into ruffles. 


Lay the gathered ribbon on the pumpkin base to get an idea of how much it will take to go around the pumpkin before cutting the ribbon off.
I used straight pins to secure ruffles to the pumpkin. They were easy to use and better than using glue. Adjust the gathers evenly along the length of the ruffle until reaching the other end. 
Once you’re finished making the ruffle, I like to use a needle to thread the end wire on and then sew the wire into the top edge of the ribbon several times to secure the wire, and then cut off the excess. 
              
 
After securing the first row of ruffles, use a rubber band to mark where to place the next ruffle on the pumpkin and draw a line around the pumpkin with a marker pen. 
                     I’m really loving this ruffle ribbon pumpkin design!


pumpkin and bow
Continue making additional ruffle layers, gathering the ribbon and adding layers, to dress up the pumpkin.
pumpkin and bow

There are now five ruffle layers on the pumpkin! Time to make an adorable bow using the Mini Bowdabra to complete this lovely, whimsical look!

pumpkin and bow

Make the bow:

Let’s start by inserting an 18″ piece of bow wire folded in half into the Mini Bowdabra, tucking ends under.

Then take a 10″ strip of ribbon for the bow tails, pinching the ribbon in the middle and inserting it down into the Mini Bowdabra.

Next, dovetail the ends by folding each ribbon end together and cutting at an angle from the corner end up to the fold on the opposite side.

Next, pinch the end of the ribbon on the roll, placing it down into the Mini Bowdabra.

Create a bow loop by folding over the ribbon at the 3″ mark on the ruler and twisting the ribbon down into the Mini Bowdabra while smoothing the ribbon out.

On the opposite side, fold over the ribbon at the 3″ mark, creating another loop, twisting the ribbon down into the Mini Bowdabra.

Then make another loop, folding over at the 2.5″ mark, twisting the ribbon down into the Mini Bowdabra and .  .  .

making another 2.5″ loop on the opposite side for a total of four loops (two on each side). 

Use the Mini Bowdabra wand to crunch down the bow .  .  .

using scissors to cut off the excess ribbon. While the bow is still in the Mini Bowdabra, thread the two loose ends of the bow wire through the loop, pulling tightly while .  .  .


gently pulling the bow out.

pumpkin and bow

And finally, tie the bow around the pumpkin stem using the Bowdabra bow wire, and then fluff the bow and all of the ruffles for a  .  .  .

pumpkin and bow

Fabulous and gorgeous looking pumpkin and bow!
pumpkin and bow