

Then cut the entire rim off and . . .

Save the rim for the handle.

Once the rim is removed, crease the top edges in half, creating four equal sections.

Then cut those sections into strips, leaving about a 1/2″ margin at the bottom.

Then crease those four sections in half and . . .

cut down those into . . .

eight sections.

Pinch those sections in half at the top and . . .

Cut the sections at the pinch, creating sixteen strips.

Open up the strips cup by pressing it down on the table.

Then place the cup upright and take a strip tip behind the strip on the left and insert it diagonally in front of the strip next to it.

Repeat the steps for each strip until all the strips are tucked in and . . .

All of the strips are tucked in.
.jpg)
Then get the top rim that was cut off of the cup . . .

and add glue to the ends.

Glue the ends to the insides of the basket to . . .

make the handle.

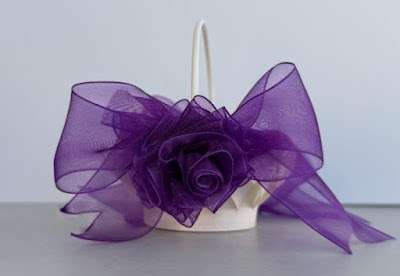
Now it’s time to decorate the basket with ribbon bows and everlasting roses!

Next, pinch the end of the ribbon on the roll, placing it down into the Mini Bowdabra.


Use the Mini Bowdabra wand to crunch down the bow, cutting off the excess ribbon.

While the bow is still in the Mini Bowdabra, thread the two loose ends of the bow wire through the loop, pulling tightly while gently pulling the bow out. Dovetail the ends by folding each end together and placing the two folded ends together, cutting the ribbon at an angle from the end up to the fold.


Cut a length of ribbon about 20 inches long.

Take the needle and pierce the ribbon in the center at about the 1″ mark.

Continue piercing the ribbon every inch or so,

making folds (petals) on the needle as you go . . .

until reaching the end of the ribbon.

Then, take the end of the ribbon where the eye of the needle is located and cut the end ribbon at an angle across the fabric.

Take the tip of the cut ribbon and insert it into the eye of the needle and . . .

Begin twisting the ribbon into a rose shape while pulling the needle through the fabric.

Once you’ve pulled the needle eye and ribbon through,

adjust and twist the petals into a pretty rose . . .

removing the needle and cutting off excess ribbon.

Use the flame of a lighter to seal the ribbon that was pulled through.

Then glue the rose to the bow and tie the bow wire onto the paper cup handle, cutting off excess bow wire. How gorgeous does this look!

Then make another rose bow for the other side and . . .

fill with your favorite candy or treats!


You have the most adorable upcycled paper cup basket to use for all occasions!

Celebrate St. Patrick’s Day with a handmade hair accessory that’s

Hi there! I’m Lisa from The Rustic Vine, part of

Create a gorgeous spring three-layer lantern swag with Bowdabra®—using

Hi everyone, Steph Ackerman here, using the Bowdabra to create

Hi everyone! I’m Joette from the Bowdabra Design Team, and

Amanda from Whimsey Wreath Design Co., LLC, and the Bowdabra