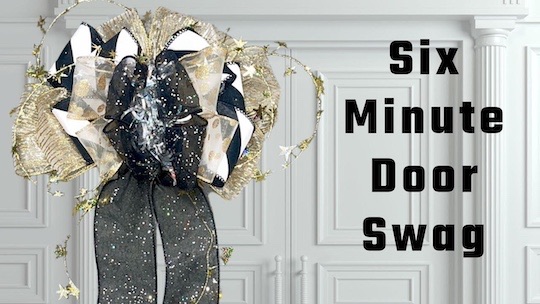
Watch this video DIY and learn how to make the best multi-use graduation bow!
Celebrate graduation in style with this sparkly and festive DIY bow—perfect for a wreath, gift box, or front door! In this quick tutorial, Sandy Sandler, the creator of the Bowdabra® Bow Maker, walks you through how to make a gorgeous graduation bow using layered ribbons, garland, and a few easy twists and folds.
One yard 2 ½” black glitter chiffon ribbon
Two yards 4” wide gold twinkling ribbon
1.5 yards 2 ½” wide black Nantucket Ribbon
One yard 2 ½” wide Ivory/gold Glitter Dots ribbon
1 yard 2 ½’ wide black Glitter Chiffon Ribbon
2.5 yds Wired Star Garland

First, cut a piece of Bowdabra bow wire. Then, fold it in half and insert it into the Bowdabra. You will have a loop on one side and two loose wires on the other side. This will serve as your slipknot. Tuck the ends under to stay out of the way while you are making your bow.
Next, lay in the star garland right into the Bowdabra. Now lay in the black glitter chiffon ribbon for the tails.
Take some twinkling ribbon and twist and lay it in the Bowdabra. Then bring it across to make a loop, twist, and fold over. Continue twisting and folding to make loops. Make sure that the right side is on the outside and the wrong side is on the inside of the bow.
Scrunch everything down with the Bowdabra wand. Next, lay in the striped ribbon and repeat the folding and twisting to make loops.
Now, add the second piece of star garland in the Bowdabra. Scrunch everything down.
Next, using the dotted ribbon repeat the twist and fold technique as you previously did, and finally do the same using black glitter chiffon ribbon. Finish with a small piece of sparkly garland in the center.
Now, scrunch everything down with the Bowdabra wand. Then, insert the loose wires through the loop and pull tight while the bow is still in the Bowdabra. Then, remove the bow from the Bowdabra, separate the ends, turn to the back, and tie a knot. Tie a double knot for extra security. The Bowdabra wire makes it so easy!
To finish, pull apart the loops and arrange the bow. You have a gorgeous multi-use Graduation bow for wreaths, door bows, gifts, and more!


Hi everyone! I’m Joette from the Bowdabra Design Team, and

Amanda from Whimsey Wreath Design Co., LLC, and the Bowdabra

Learn how to easily create a beautiful lemon lantern

Hi everyone, Steph Ackerman here to share Caramel’s Bunny Ears

Celebrate St. Patrick’s Day with a delightful handmade pin that’s

Amanda from Whimsey Wreath Design Co., LLC, and the Bowdabra