
A clay handprint dish is sure to be a keepsake piece for Dad on Father’s Day. Air-dry clay makes this an easy project for young artists. Plan ahead for this project, though—it may take several days for the clay handprint to thoroughly dry. 

Gather these supplies: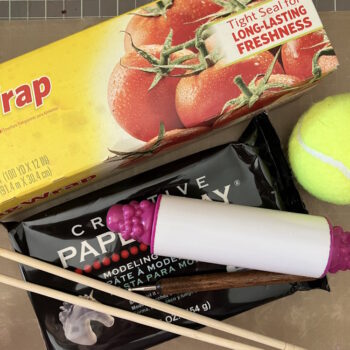

- Air dry clay
- Plastic film
- Rolling pin
- Thin dowel rods, knitting needles, or skewers
- Stylus or old ballpoint pen
- Butter knife
- Ball or rounded bowl
Let’s make dad’s special clay handprint dish:
- Knead the clay to soften it, then use the rolling pin to roll out an even thickness of about 1/8″ to 3/16″. Placing knitting needles or skewers on each side of the clay helps to ensure even thickness.

- With a stylus or old ballpoint pen trace the outline of the child’s hand.

- With a butter knife carefully cut away the excess clay from the traced print.

- You will probably have rough edges on the cutout handprint.

- But the beauty of air dry clay is that it is so easy to fix rough edges and minor flaws. While the clay is still moist, use a paintbrush dipped in water to smooth the uneven edges.

- Now, test the size of the child’s hand against the ball or bowl that will be used as the mold. All sizes of balls are great options—tennis balls, baseballs, softballs—as are rounded bowls.

- Cover the ball or bowl with plastic film, stretching the film to eliminate as many wrinkles as possible.

Finishing the handprint dish
- Shape the clay handprint dish over the inverted mold. Set aside to dry. Drying time will largely depend on the thickness of the clay and the humidity of the air. Air drying is preferable to oven drying, which can lead to cracks from too fast, uneven drying. But in a pinch, if you need to finish the drying process in an oven, make sure the mold is ovenproof and won’t melt or break. Then, 1.) preheat the oven to 150°F; 2.) turn the oven off; 3.) place mold and clay handprint in the oven.

- When the handprint is thoroughly dry it can be sanded with fine grit sandpaper to achieve a smooth, even surface. Handle the dish carefully—remember, it is clay not concrete.

- Leave the dish plain or paint it with acrylic paints, or colored with markers.
