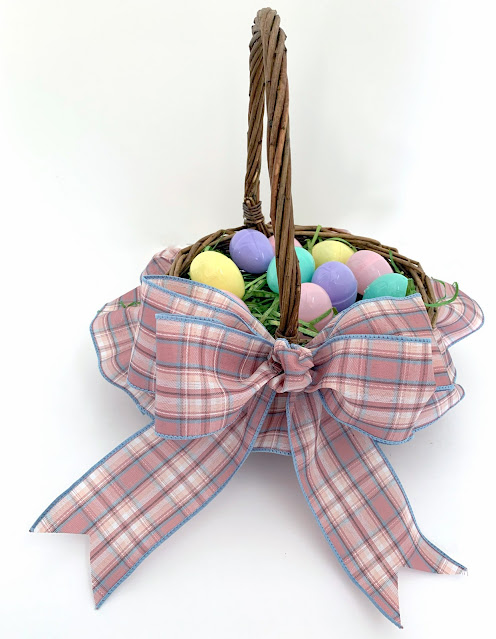
Spring and Easter is just around the corner so now is the time to make an adorable ruffle ribbon and bow Easter basket! You won’t believe how easy and fun it is to decorate a basket using ribbon and your Mini Bowdabra.
And the best part about this is that once Easter is over you can use the ruffle ribbon and bow basket for just about any occasion during Spring and Summer! It’s just that adorable!
Supplies:
- Straw basket w/handle
- Measuring tape
- 2.5″ wide wired ribbon
- Pencil or small rod for wire
- Fabri-Tac quick grab/dry fabric glue
- Mini Bowdabra, Measuring Tool, Wand
- Bowdabra Bow Wire
How to:
First, measure around the outside of the basket just below the handle. Triple the length of that measurement for the ruffled ribbon just in case you are not using a roll of ribbon. You want to have enough ruffled ribbon to go around the basket Although you will need more ribbon for the bow.
Next, take a look at the ribbon you’ve chosen and determine which side would be best suited for the top of the ruffle. Make sure the pattern is upright nd not upside down.Then, leaving the ribbon on the roll, begin gently pulling the wire out of the top side of the ribbon gathering the ribbon.
You want the ruffle to be very curvy so don’t skimp on the amount of ribbon used.
Continue pulling the wire, gathering the ribbon into ruffles. I like to wrap the excess wire around a pencil or small rod to keep it out of the way. Once you think you’ve ruffled enough ribbon, measure the ruffle around the basket right under where the handle ends.
If you’ve gathered enough ribbon for the ruffle, remove the wire from the pencil and cut off most of it, leaving a small amount to crimp together into a knot, folding over a small amount of ribbon to make a hem on the edge. Add a bit of glue to seal the hem. Begin adding glue in increments along the basket where you will be placing the ruffle.
Then place the beginning of the ruffle on the glue, pressing the ruffle down on the glue and evenly onto the basket.
Now, continue adding glue to the basket and then the ruffle going around the basket until you reach the area where you began.
To end the ruffle, cut off the ribbon. Leave enough ribbon to pull the wire out to secure it in a knot, making a hem on the end of the ribbon. Glue in place.
How cool does this ruffled ribbon look around the basket?
So cute!
How to Make a Matching Bow using the Mini Bowdabra:
First, cut an 18″ piece of Bowdabra bow wire. Next, fold it in half, and place it down into the Mini Bowdabra, tucking ends under.
Take a 15″ strip of matching ribbon pinch the ribbon in the middle and insert it down into the Mini Bowdabra for the bow tails.
Next, pinch the end of the ribbon on the roll placing it down into the Mini Bowdabra.
Then create a loop by folding over the ribbon a little over the 3″ mark on the Bowdabra measuring tool, creasing the ribbon down into the Mini Bowdabra. On the opposite side, fold over the ribbon a little over the 3″ mark creating another loop. Pinch the ribbon down into the Mini Bowdabra. Make one more loop, as before, down into the Mini Bowdabra and then . . .
make another for a total of four loops – two on each side.
Use the Mini Bowdabra wand to crunch down the bow.
Leave about two inches of ribbon for the finished center, and crunch down the bow again to…
cut off the excess ribbon.
While the bow is still in the Mini Bowdabra, thread the two loose ends of the bow wire through the loop. Pull tightly while gently pulling the bow out.
Then adjust the center ribbon fabric into a decorative knot look.
Dovetail the ends by folding each end together and placing the two folded ends together. Then cut the ribbon at an angle from the fold down to the end.
Tie the bow wire around the bottom of the basket handle for a decorative bow look!
For more amazing crafts and tutorials visit Bowdabra designer, Gail’s blog Purple Hues, and me.
And be sure and like us on Facebook and join us Each Monday at 4:00 p.m. PST, 5:00 p.m. MST, 6:00 p.m. CST, and 7:00 p.m. for an informative and creative live!

