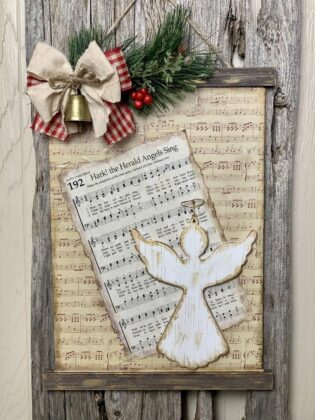
Get ready to take your holiday decor to new heights with our newest Bowdabra Design Team Member, Brandy Downs from A Rustic Stitch! In this exciting tutorial. Brandy will show you how to create a heavenly angel wall hanging that will bring a touch of magic to your home.
Follow these step-by-step instructions to create this amazing DIY project. Easily infuse your space with charm and nostalgia. So, get your creative juices flowing, grab your materials, and let Brandy be your guide as you for this enchanting holiday crafting adventure. Let’s dive in and create something truly special together!

Materials:
Dollar tree sign
Sheet music scrapbook paper & hymn sheet
Angel ornament
Floral wire
Modpodge
Truffle chalk paint
Acrylic paint, caramel and metallic gold
Distressing ink, Walnut stain
Red and tan plaid ribbon or fabric
Jute
Bell
Greenery
How to make a heavenly angel wall hanging

Instructions:
First, brush some truffle chalk paint over the framing of the sign. Let it dry and then brush some caramel color acrylic paint over the top.
Next, cut the music print scrapbook paper to fit your frame. (you can tea stain your scrapbook paper if desired) Then, spread some ModPodge all around the front of your sign and place the scrapbook paper on top. Smooth out any wrinkles with your fingers.
Sand all around the edges. Go around with the distressing ink and even a little on the front.
Now, take the hymn sheet and tear all around to deckle the edges. Then use the distressing ink to further enhance the page. Attach with some ModPodge on an angle on the frame. Then put another coat of ModPodge on the entire front of the sign.
Prepare the angel ornament by sanding all around and then use the distressing ink on the edges. Paint some floral wire with the gold metallic paint adding some randomly on the angel itself as well. Attach the halo to the angel and glue her to the sign.
Make the bow
Cut a piece of Bowdabra bow wire. Then, fold it in half and insert it into the Bowdabra. You will have a loop on one side and two loose wires on the other side. This will serve as your slipknot. Tuck the ends under to stay out of the way while you are making your bow.
Next, place some red plaid ribbon in and make loops back and forth. Then, add some plain muslin fabric and make loops with that. Scrunch down with the bow wand and pull the wires through the loop and remove from the Bowdabra. Turn to the back and tie a knot.
To finish, attach the bow to the frame. Glue some greenery, berries and a bell to the bow and fluff out. You have the most adorable angel wall hanging to display all season long!
Be sure to check out more amazing tutorials like this from Brandy at A Rustic Stitch! You can find her on TikTok, Facebook, and Instagram too. Follow her for more creative inspiration and crafty ideas. For more angel crafts like a ribbon tree top angel and hundreds of video DIY’s check out the Bowdabra blog and follow us on Facebook!