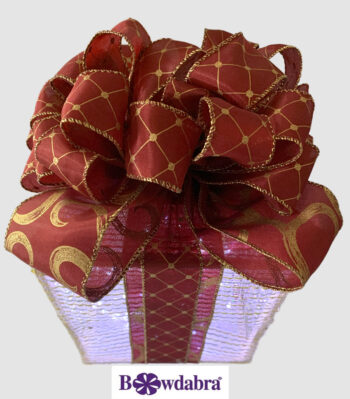
Tis the season for creating holiday party decor! So why not give your home an extra holiday sparkle with a easy to make light up gift box! Imagine this lovely handcrafted lighted gift box as a centerpiece, or make several to place along the entire table! How cool would that be! And the best part, you can use any type of ribbon and deco mesh to fit the occasion. But I must tell you, it’s all about the bow! And a Bowdabra bow at that! Here’s how:

Supplies
- Wood craft sticks – twelve 6″
- Parchment paper/craft mat with line measurements
- Wood glue/Hot glue
- Deco mesh fabric
- Ruler/Scissors
- 2.5″ & 1.5″ Wired Ribbon
- Clamps
- Battery operated Twinkle lights
- Double sided tape
- Bowdabra tool and wand
- Bowdabra bow wire
How to
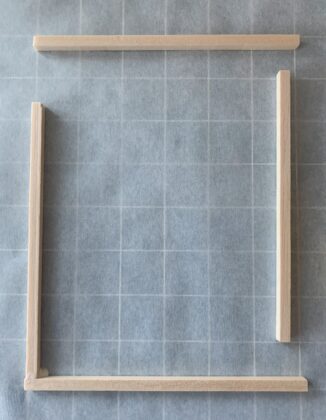
Let’s begin by laying a sheet of parchment paper on top of a craft mat with line measurements. Use the straight lines on the craft mat to make sure the sticks are straight when gluing together. The parchment paper is used to help prevent the materials from sticking to the work surface.
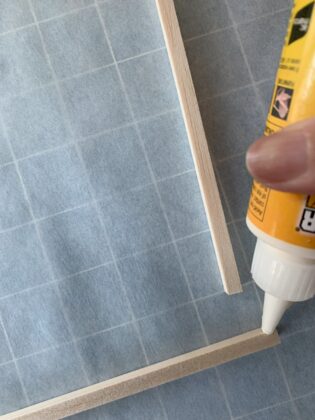
Next, line up four craft sticks, gluing one side at a time together . . .

Using wood glue super glue . . .

to create a box shape frame. Make one for the bottom and one for the top of the box. Let dry.
Once dry, take one box shape frame and begin gluing on the side wood sticks, one side . . .
at a time until . . .
all four sides are glued on. Re-enforce the stick connections in the corners with more glue and let dry completely.
Once the sides are dry, glue on the top to the side sticks to . . .
form the shape and frame of the box.
Next, cover the wood frames with deco mesh fabric, using hot glue on each frame to secure, one side at a time. Use clamps to hold the mesh in place while drying.
Leave the bottom of box open to access lights.
Once dry, cut off excess mess along the frame using scissors.
Once the frame is covered with deco mesh and trimmed, cut 2.5″ ribbon long enough to wrap around three sides of box, crisscrossing on top – imitating a wrapped gift. Glue ribbon ends to bottom of box frame.
Next, it’s all about making a beautiful Bowdabra bow!
To make a lovely bow with lots of loops, fold an 18″ piece of bow wire in half and place into the Bowdabra. Then pinch the end of the 2.5″ ribbon on the roll placing it pattern side down into the Bowdabra.
Create a loop by folding over the ribbon at 4.5 inches. Twist the ribbon down into the Bowdabra smoothing the ribbon out.
Next, fold and twist the other side at the same 4.5″ width, down into the Bowdabra creating another loop.
Make two more loops the same width on opposite sides, using the Bowdabra wand to crunch down the loops.
Next, cut 15 feet of 1.5″ wired ribbon from the spool. Fold the ribbon in half to find the center and crease, placing the ribbon pattern side down on top of the 2.5″ bow into the Bowdabra.
Make a three and a half inch loop by folding and twisting the ribbon down into the Bowdabra to make the first loop.
Next, fold and twist the other side at the same 3.5″ width, down into the Bowdabra.
Continue to fold and twist the ribbon tails, one at a time, alternating sides, down through the center of the Bowdabra until reaching the end of the ribbon. Scrunch down all of the ribbon using the Bowdabra wand.
Then remove the wand and thread the two loose ends of the bow wire through the loop at the other end, pulling the wire tightly and gently pulling out the bow. Separate the two loose ends, taking them around to the back and tying in a double knot.
Tie the bow to the smaller ribbon on top of the box with the bow wire, tying in a knot. Cut off excess bow wire. Fluff and straighten bow.
Place twinkle lights inside the box attaching the battery box with double sided tape under the bow of your light up gift box.
The light up gift box looks absolutely stunning topped with an adorable bow made using the Bowdabra bow making tool!