Hey everyone! It’s Amanda from Whimsy Wreath Design Co LLC. I’m so excited to be here and share this fun holiday Candy Cane wreath for Christmas in July! The Bowdabra is hands down my most often used tool in my wreath workshop and for the holidays, it gets even more use. It’s the best tool to make bows for any of your holiday decorating, gift giving and home décor projects.
This is one of my favorite winter & holiday crafts. You can make the candy cane any theme you’d like – holiday, winter, Christmas, snowflake, peppermint…the options are endless! It’s also fun to make and I’ve been doing these as holiday workshops for the last two Christmases. Also, you can use one, two or more ribbons for the bow – it’s totally up to you! I did a 3-ribbon bow for this one. Let’s get making!

How to make a Bowdabra Candy Cane wreath
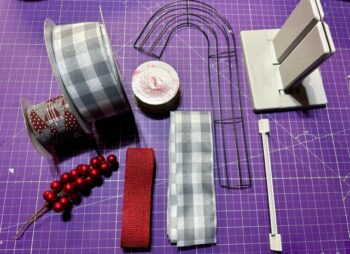
Materials List:
Candy Cane Wreath Frame from Dollar Tree
2.5 yards plus another 24 inches of 2.5” Gray and White Plaid Ribbon
24 inches of a 2.5” fabric of your choice (Mine is from Hobby Lobby)
24 inches of 1.5” Red Burlap Ribbon
1 Dark Red Silk Flower (I used a large rose)
Red Berry Floral Pick
Pinecones
Glue Gun
Scissors
Instructions:
Let’s Start with the Bow:
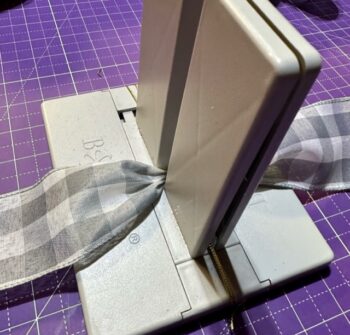
1-First, cut a long piece of Bowdabra wire, fold it in half, place it in the large Bowdabra, and tuck the ends under. Take out your 24-inch cut of ribbons for this bow. Measure 6” of the gray and white plaid ribbon and place the Bowdabra. Twist the center and press down.

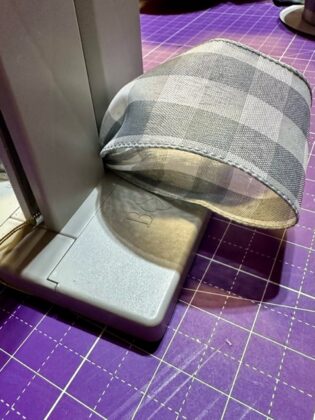
2-Next, make a 5-inch loop of the ribbon, twist, and press into the center of the Bowdabra.

3-Then, repeat on the other side of the Bowdabra. Measure a 5-inch loop, twist and press the middle into the Bowdabra.
Continue making your candy cane bow
4-At this point, you will have two complete loops in the Bowdabra. Repeat steps 2-5 to make two more 5” loops on each side, twisting and pressing the center into the Bowdabra. Lay the second loop on top of the first one.
5-Once the second ribbon is complete, you’ll do the exact same process for the 3rd ribbon if you choose to have one. Measure 6 inches, then a 5” loop on each side of your Bowdabra, with one tail on each side.
6-Using the Bowdabra wand, press down on the wand and fluff the loops so they stand up on their own. This will help the bow stay in shape when you place it on the wreath. Dovetail the ends of the ribbon. Remove the wand, then place the end of the Bowdabra wire that has two ends through the loop end to make a slipknot. Pull your bow out of the Bowdabra while securing the wire to tighten around the bow. Once the bow is out, I like adding a double knot to the wire to give it extra security.
.
Finishing your Candy Cane Wreath
7-Now your bow is complete! Set it aside and let’s make the ribbon-wrapped candy cane. Start by taking your 2.5 yard cut of gray and white plaid ribbon. Flip the candy cane form over and like the bottom of the candy cane so it hits in the middle of your plaid ribbon. We’ll tuck the extra in when we’re done so don’t worry! Use a small dab of hot glue to hold the first part of ribbon while we work on the frame.
8-While holding the ribbon in one hand, roll the candy cane frame over, so that the ribbon wraps around the candy cane. Keep the edge of the ribbon in the middle when you roll it over, so that it’s equally placed over the candy cane. My tip – hold the ribbon still and move the candy cane, so you’ll have more control of the ribbon placement.
9-Keep repeating this process, making the edge of the ribbon in the middle of the ribbon on the candy cane. Use the squares on the plaid ribbon as a guide.
10-Complete the process until the whole candy cane frame is covered with the plaid ribbon. When you get to the curved part at the top of the candy cane, adjust a bit to allow the ribbon to turn with the frame. Then, when you’re at the end of the candy cane, end it the same that we started. Leave a little ribbon over the edge of the frame.
11-Now, tuck in the ends by just folding them up into the candy cane. They should fold over into themselves and put a small dot of hot glue to hold the ribbon edge shut where you folded. Now your candy cane is covered and complete! Let’s add the bow.
12-Using the Bowdabra wire on the bow, attach the bow by flipping the candy cane over and tying the wire into a double knot. You can place the bow anywhere on the candy cane you’d like! I usually choose the middle or a little higher.
12-With your bow now attached to the candy cane, the design is complete! I added a small red berry floral pick, just by tucking it into the bow loops and securing with a little hot glue. Then, fluff the loops to your liking and your beautiful candy cane is now ready to hang and enjoy!
I hope you had fun making your candy cane. The themes and colors are endless! These also make wonderful gifts, especially for those on a budget, living in small spaces or if you need several similar but different gifts for friends or loved ones.
Thank you for joining me and I’ll see you next time with a new project using the Bowdabra!