Creating beautiful DIY swag and bows is an easy and inexpensive way to add some personal flair to your home or event decorations. With just a few simple bow-making materials and some creativity, you can make stunning swag and bows in just a few minutes. In this blog post, we’ll show you how to create a stunning cemetery saddle, a spring door swag, bows, and more in just a few minutes.
Watch this Facebook Live as Sandy and Joette from Bowdabra teaches how to make these stunning DIY bows and swags easily!
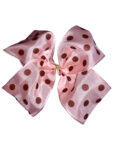
DIY Hair Bow (Starts at 0:34)
Materials required:
- 100-Yard Bowdabra Bow Wire
- Mini Bowdabra
- Pink Polka Dot Ribbon

DIY Hair Bow
Process:
- Sandy folds the bow wire in half and tucks it underneath the Bowdabra.
- She folds the ribbon in half, puts that down into the Bowdabra, and creates 4 loops.
- She secures the bow with several wire knots in the back and finishes off by fluffing the loops.
Big Rag Bow (Starts at 2:45)
Materials required:
- 100-Yard Bowdabra Bow Wire
- Large Bowdabra
- Dollar Tree Grass Skirts
- Dollar Tree Lemon Printed Quilting Strips, Blue Quilting Strips
- Neutral Fabric Ribbon, 2 ½” Blue Burlap, Chicago Ribbon
Big Rag Bow
Process:
- Joette folds the bow wire in half and tucks it underneath the Bowdabra.
- She lays down a half grass skirt, lemon-printed quilting strips, and blue quilting strips into the Bowdabra.
- Then she puts another half of the grass skirts and another two pieces of lemon-printed quilting strips into the Bowdabra.
- She places the neutral fabric ribbon in and creates 1 loop leaving 2 tails. She repeats the process again.
- She lays down the blue quilting strip into the Bowdabra and creates 1 loop leaving 2 tails. She repeats the process again.
- She places the lemon-printed quilting strip in and creates 1 loop leaving 2 tails.
- She puts the blue burlap ribbon (dovetailed) in and creates 1 loop. In the same fashion, she creates 1 more loop.
- Next, she places the lemon-printed quilting strip in and creates 1 loop.
- She holds the Chicago ribbon and scrunches it down into the Bowdabra.
- She secures the bow with several wire knots in the back and finishes off by fluffing the loops.
Hair Bow (Starts at 8:35)
Materials required:
- 100-Yard Bowdabra Bow Wire
- Mini Bowdabra
- Green-White Gingham, Yellow Floral Ribbon Roll
- Brooch
- Zot Glue
Hair Bow
Process:
- Sandy folds the bow wire in half and tucks it underneath the Bowdabra.
- She places two dovetailed tails from the green-white gingham ribbon roll and six dovetailed tails from the yellow floral ribbon roll and two more dovetailed tails from the green-white gingham ribbon roll inside the Bowdabra.
- She secures the bow with several wire knots in the back and finishes off by fluffing the loops.
- In the end, she takes a pretty little brooch and puts it in the center of the bow with zot glue.
DIY Cemetery Saddle (Starts at 11:00)
Materials required:
- 100-Yard Bowdabra Bow Wire
- Large Bowdabra
- Greenery Picks, Floral Bush, Yellow Lily Picks, Yellow Fillers, Purple Floral Pick
DIY Cemetery Saddle
Process:
- Joette folds the bow wire in half and tucks it underneath the Bowdabra.
- She lays down a few pieces of greenery, a floral bush, big yellow lily picks, more greeneries, yellow fillers, and purple floral picks into the Bowdabra.
- She secures the bow with several wire knots in the back and finishes off by fluffing the loops.
- In the end, she attaches the cemetery saddle flowers to the bars.
DIY Scrunchy Bow (Starts at 19:24)
Materials required:
- 100-Yard Bowdabra Bow Wire
- Large Bowdabra
- Red Scrunchy Ribbon Roll
Process:
- Sandy folds the bow wire in half and tucks it underneath the Bowdabra.
- She places the red scrunchy ribbon into the Bowdabra and creates 2 loops.
- She holds the red scrunchy ribbon and scrunches it down into the Bowdabra.
- She secures the bow with several wire knots in the back and finishes off by fluffing the loops.
DIY Swag (Starts at 20:55)
Materials required:
- 100-Yard Bowdabra Bow Wire
- Large Bowdabra
- 21” Wide Yellow Mesh Ribbon Roll
- Green-White Gingham and Yellow-White Gingham Ribbon Roll
- Floral Picks
DIY Swag
Process:
- Sandy folds the bow wire in half and tucks it underneath the Bowdabra.
- She holds the yellow mesh ribbon and scrunches it down into the Bowdabra.
- She lays down 1 piece of green-white gingham ribbon (with a dovetailed end) into the Bowdabra.
- She places 1 piece of yellow-white gingham ribbon (with a dovetailed end) inside the Bowdabra.
- She lays down a few pieces of floral picks.
- She lays down a piece of green-white gingham ribbon and creates 7 loops. Then she places 1 piece of yellow-white gingham ribbon and creates 10 loops.
- She lays down a few pieces of floral picks.
- She secures the bow with several wire knots in the back and finishes off by fluffing the loops.
DIY Swag (Starts at 26:25)
Materials required:
- 100-Yard Bowdabra Bow Wire
- Large Bowdabra
- Hello Spring Ribbon Roll
- Turquoise/Teal Ribbon Roll
- Pink Gingham Check Ribbon Roll
- Eucalyptus Picks
DIY Wreath Bow
Process:
- Sandy folds the bow wire in half and tucks it underneath the Bowdabra.
- She lays down 2 tails of hello spring ribbon (with a dovetailed end) into the Bowdabra. Then she places another piece of the same ribbon.
- She places 1 piece of turquoise/teal ribbon (with a dovetailed end) inside the Bowdabra.
- She puts a few eucalyptus picks, 1 piece of pink gingham ribbon, few more eucalyptus picks, 2 pieces of pink gingham ribbon, 1 piece of hello spring ribbon, few more eucalyptus picks, 2 pieces of turquoise/teal ribbon, another piece of pink gingham ribbon and few more eucalyptus picks into the Bowdabra one-by-one.
- She secures the bow with several wire knots in the back and finishes off by fluffing the loops.
Please join us on Mondays at 4:00 p.m. PST, 5:00 p.m. MST, 6:00 p.m. CST, and 7:00 p.m. EST each week for another fun Facebook live.
Did you miss any Facebook lives? You can find DIY decor bows and more at the Bowdabra blog!

