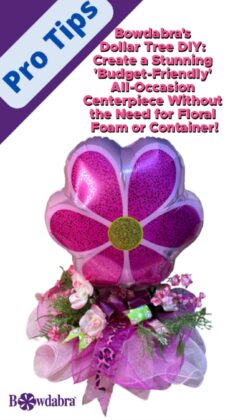
Looking for a budget-friendly DIY centerpiece for your upcoming baby shower or any occasion? Look no further than Bowdabra! Our easy-to-follow tutorial will show you how to create a stunning all-occasion centerpiece without the need for floral foam or a container. With just a few simple materials from Dollar Tree, you can create a centerpiece that will impress your guests and fit your budget. Follow along to learn how to make this beautiful centerpiece that’s perfect for any occasion.

3 yards of 21″ wide Deco Mesh
2 – 10” strips of 2.5” wide ribbon
2 – 12” Strips of 6” wide Nu-Ganza, Tulle or Deco Mesh
18″ Mylar Balloon (Flat)
set of stick and cup for balloons
3 yards of 2.5” wide ribbon
2 – 16” strips of a sheer ribbon
2 – 16” strips of a printed ribbon
3 yards of 2.5” wide sheer ribbon
Dollar Tree foliage bush
Two Dollar Tree linear floral bushes
Dollar Tree filler floral bush
Dollar Tree rose or other focal floral bush
Bowdabra Bow Wire
Large Bowdabra
Mini Bowdabra
Optional:
Zip ties and hot glue
2 strips of 2.5” wide ribbon for banners
Letters for banner
1 yard of 21″ wide Deco Mesh in a different shade

First, start with an 18″ mylar balloon and cup and stick. Inflate the balloon with air instead of helium.
Next, cut a length of Bowdabra bow wire fold it in half and place it in the Bowdabra. Use the Mini Bowdabra to scrunch some tulle to make a bow, then scrunch down the 2 1/2″ wide wired organza ribbon. Thread the wire through the loop of the bow wire, and remove and tie a knot. Now, repeat this step with just the organza ribbon scrunchy bow style. Then, attach both mini bows to the mylar balloon. Fluff and arrange both mini bows.
First, add the Bowdabra bow wire as you did on the Mini. Tuck the ends under to stay out of the way.
Now fold the ends under a bit and scrunch down three yards of 21″ wide deco mesh in the Bowdabra. This will hide and stop any future fraying. Next, add the optional second color of decor mesh in the same way. Scrunch everything down with the Bowdabra wand.
Now using the flower print ribbon create a loopy bow twisting and folding and making sure the right side is up. Make two loops on each side and one tail.
Next, make a funky style bow using the flower print ribbon and corresponding ribbon. Lay the strips in the making a loop on one side and tail on the other. Then, add the greenery bush and florals. Add the filler flowers and finally add the focal flowers.
Make a scrunchy bow and then create a looped ribbon bow with 1 1/2″ wide wired ribbon with three loops on each side. Scrunch everything down.
To finish, bring the loose ends of the wire and pull them through the loop to create a slip knot. Pull tight. Remove the arrangement from the Bowdabra, separate the ends, turn to the back and tie a knot. Double knot it for extra security.

Add the balloon to the center with either Bowdabra bow wire, zip tie, or hot glue.
Fluff and shape your arrangement. You have a lovely all-occasion centerpiece and it was created in just minutes with the Bowdabra!
* Please note that the price I quoted in this video for this centerpiece, under $10, includes the cost of new materials as well as bits and pieces of ribbons that I already had on hand. Your cost may vary depending on the materials you choose to use.
For more quick and easy DIY tutorials like this centerpiece please visit the Bowdabra blog each week. And be sure and like us on Facebook. Each Monday at 4:00 p.m. PST, 5:00 p.m. MST, 6:00 p.m. CST, and 7:00 p.m. EST, Bowdabra creator, Sandy Sandler, hosts Facebook live. There is always something new to make and we take you through the easy steps. Additionally, each week one lucky viewer will receive a special gift!
Check out all the beautiful Bowdabra ribbons too!
Music: All New, Musician: A Month of Sleep, Album: A Month of Sleep, Source: VCG