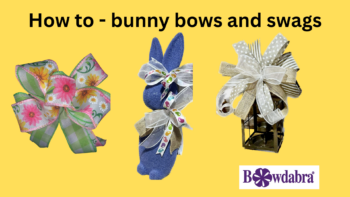
Want something that can live on past the holiday? We’ve got you covered there as well. If you see Easter as the official start of spring, you can also craft a few pretty wreaths that’ll welcome the warmer weather by incorporating Easter flowers and summer/spring colors. Grab our bow-making materials that are needed to craft these bunny bows and swags and get to making these DIY projects!
Watch this Facebook Live as Joette, Amanda, and Sandy from Bowdabra teaches how to make these easy DIY Swags and bows, and so much more!

DIY Bunny Bows (Starts at 1:37)
Materials required:
- Large Bowdabra
- Multicolored ribbon
- Orange Ribbon
- Yellow Burlap Ribbon
- Pipe cleaners
- Yellow Bunny
Process:
- Amanda places the 6” multicolored ribbon tail (dovetailed) into the Bowdabra and creates 2 loops.
- She lays down the orange ribbon tail (dovetailed) into the Bowdabra and creates 2 loops.
- She places the yellow burlap ribbon tail (dovetailed) into the Bowdabra and creates 2 loops.
- She secures the bow with the pipe cleaner, puts several knots in the back, and finishes off by fluffing the loops.
- Using the mini Bowdabra, she puts the multicolored ribbon tail in, twists and pushes down, and creates 2 loops.
- She lays down the orange ribbon tail (6”) right in the middle.
- She puts the pipe cleaner around the bow to secure it.
- In the end, she ties both bows to the cute yellow bunny (soft toy).

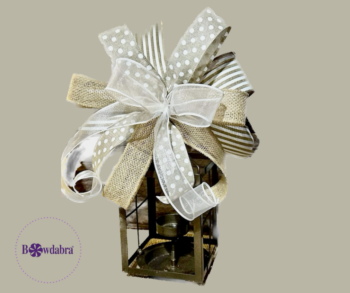
Lantern Bow (Starts at 16:16)
Materials required:
- Large Bowdabra
- Pipe cleaners
- 2 ½” black-white striped ribbon
- polka dot ribbon
- burlap ribbon
- white sheer ribbon
- Lantern
Process:
- Amanda places the 2 ½” black-white striped ribbon tail into the Bowdabra and creates 2 loops.
- She lays down the polka dot ribbon tail into the Bowdabra and creates 2 loops.
- She places the burlap ribbon tail into the Bowdabra and creates 2 loops.
- She places the white sheer ribbon tail into the Bowdabra and creates 2 loops.
- She secures the bow with the pipe cleaner, puts several knots in the back, and finishes off by fluffing the loops.
- In the end, she attaches the bow to a lantern.
DIY Spring/Summer Mini Bow (Starts at 10:24)
Materials required:
- 100-Yard Bowdabra Bow Wire
- Mini Bowdabra
- Floral ribbon
- Green-White Ribbon
Process:
- Sandy folds the bow wire in half and tucks it underneath the Bowdabra.
- She holds both the ribbons and puts them inside the Bowdabra and then places both the ribbons in and creates 5 loops.
- She secures the bow with several wire knots in the back and finishes off by fluffing the loops.
DIY Swag (Starts at 13:38)
Materials required:
- 100-Yard Bowdabra Bow Wire
- Large Bowdabra
- Greenery, leaves, yellow Floral, white floral, lavender, lemon Picks
- Lemon Ribbon Roll
- Yellow Ribbon Roll
- Black Ribbon Roll
- Black-White Ribbon Roll
Process:
- Joette lays down a few greenery, leaves, yellow Floral, white floral, lavender, and lemon picks into the Bowdabra.
- She places two tails (dovetailed ends) from the lemon ribbon roll inside the Bowdabra.
- She places 4 tails one by one and creates 4 loops.
- She places the yellow ribbon and creates 2 loops and 2 tails.
- She lays down the black ribbon and creates 2 loops into the Bowdabra.
- She places the black-white ribbon and creates 2 loops into the Bowdabra.
- She secures the bow with several wire knots in the back and finishes off by fluffing the loops.
Lavender Bunny (Starts at 23:40)
Materials required:
- Large Bowdabra
- Mini Bowdabra
- Pipe cleaners
- Funny little jelly beans Skinny Satin Ribbon
- Burlap Ribbon
- White Sheer Ribbon
Process:
- Amanda places the burlap ribbon tail (dovetailed) into the large Bowdabra and creates 2 loops.
- She lays down the white sheer ribbon tail (dovetailed) into the Bowdabra and creates 2 loops.
- She places the jelly beans ribbon tail (dovetailed) into the Bowdabra and creates 1 loop.
- She secures the bow with the pipe cleaner, puts several knots in the back, and finishes off by fluffing the loops.
- Amanda places the mini Bowdabra. Then she puts the white sheer ribbon in and creates 1 loop.
- She places the jelly beans ribbon in and creates 2 loops.
- She secures the bow with the pipe cleaner, puts several knots in the back, and finishes off by fluffing the loops.
- In the end, she attaches both bows to the lavender bunny.
DIY Scrunchy Bow (Starts at 28:00)
Materials required:
- 100-Yard Bowdabra Bow Wire
- Large Bowdabra
- Silver Scrunchy Ribbon Roll
Process:
- Sandy folds the bow wire in half and tucks it underneath the Bowdabra.
- She places the silver scrunchy ribbon and scrunches it down into the Bowdabra.
- She secures the bow with several wire knots in the back and finishes off by fluffing the loops.
Please join us on Mondays at 4:00 p.m. PST, 5:00 p.m. MST, 6:00 p.m. CST, and 7:00 p.m. EST each week for another fun Facebook live.
Did you miss any Facebook lives? You can find DIY decor bows and more at the Bowdabra blog!