If you want to deck your home for the upcoming holiday seasons, these Hanukkah and Christmas DIY decorating ideas will help make your home festive and beautiful. Not only are they budget-friendly, but they’re also relatively easy to pull off – Here are some fun 5 DIY Bow & Wreath Designs For Hanukkah and Christmas. So, gather your bow wreath-making supplies! Watch this Facebook Live as Nick from Nick’s Seasonal Décor teaches how to make gorgeous DIY Bow & Wreath Designs For Hanukkah and Christmas.
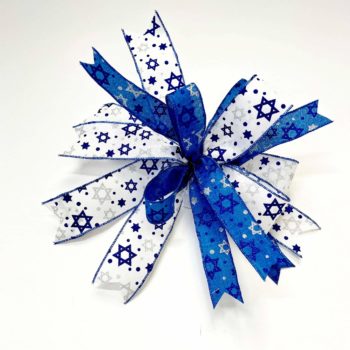
Funky Bow for Hanukkah (Starts at 1:45)
Materials required:
- 100-yard Bowdabra bow wire
- Large Bowdabra
- White-Blue Star Print Hanukkah Ribbon Roll
- Blue Star Print Hanukkah Ribbon Roll

Funky Bow for Hanukkah
Process:
- Nick folds the bow wire in half and tucks it underneath the Bowdabra.
- He creates 1 loop (4 ½” loop, 6”-8” tails) with White-Blue Hanukkah ribbon, cuts it off, and places it inside the Bowdabra.
- Next, he takes the Blue Hanukkah ribbon, creates 1 loop, snips it off, and places it on the Bowdabra.
- In the same fashion, he creates a total of 3 layers of loops for each ribbon.
- He pulls the bow wire from one end to the other and ties the bow.
- He finishes off by fluffing the loops and cutting the dovetail pattern on the tail ends.
DIY Tails Only Bow (Starts at 7:35)
Materials required:
- 100-yard Bowdabra bow wire
- Large Bowdabra
- Green-Red Ribbon Roll
DIY Tails Only Bow
Process:
- Nick folds the bow wire in half and tucks it underneath the Bowdabra.
- He cuts off a bunch of long tails (6 tails about 12”) from the ribbon roll and places them inside the Bowdabra.
- Next, he cuts off a bunch of comparatively smaller tails (4 tails about 6” – 8”) from the same ribbon roll and keeps the smaller pieces on the top to create a flower design.
- He pulls the bow wire from one end to the other and ties the bow.
- He finishes off by fluffing the loops and cutting the dovetail pattern on the tail ends.
DIY Wreath for Hanukkah and Christmas (Starts at 13:50)
Materials required:
- 100-yard Bowdabra bow wire
- Large Bowdabra
- 7/8” Blue Ribbon Roll
- 14” Grapevine Wreath
- Greenery Picks (Yellow/Green Color)
- Blue Flower Sprays/Picks
- Hot Glue
DIY Wreath for Hanukkah and Christmas
Process:
- Nick folds the bow wire in half and tucks it underneath the Bowdabra.
- After cutting off the two tails from the blue ribbon roll, he places them right into the Bowdabra.
- He takes the ribbon, flips it inside out, places it on the Bowdabra, and creates 10 loops(3”).
- He pulls the bow wire from one end to the other and ties the bow.
- He finishes off by fluffing the loops, cutting the tail ends at an angle, and curling up the tails.
- In the end, he sticks the bow securely to the wreath and adds some greenery picks, and blue flower sprays with hot glue.
DIY Funky Bow (Starts at 24:10)
Materials required:
- 100-yard Bowdabra bow wire
- Large Bowdabra
- Bittersweet Flower Print Ribbon Roll
DIY Funky Bow
Process:
- Nick folds the bow wire in half and tucks it underneath the Bowdabra.
- He takes the ribbon, flips it inside out, creates 2 loops, and snips it off.
- In the same fashion, he creates 4 more loops on the Bowdabra.
- He pulls the bow wire from one end to the other and ties the bow.
- He finishes off by fluffing the loops and cutting the dovetail pattern on the tail ends.
DIY Present Bow (Starts at 27:17)
Materials required:
- 100-yard Bowdabra bow wire
- Large Bowdabra
- Yellow-White Polka Dot Ribbon Roll
DIY Present Bow
Process:
- Nick folds the bow wire in half and tucks it underneath the Bowdabra.
- He takes the ribbon, flips it inside out, places it on the Bowdabra, and creates 8 loops.
- Then, he pulls the bow wire from one end to the other and ties the bow.
- He finishes off by fluffing all the loops.
5 DIY Budget-Friendly Hanukkah and Christmas Home Decor Ideas
Please join us on Mondays at 4:00 p.m. PST, 5:00 p.m. MST, 6:00 p.m. CST, and 7:00 p.m. EST each week for another fun Facebook live.
Did you miss any Facebook lives? You can find DIY decor bows and more at the Bowdabra blog!
