Making a stunning DIY bow and wreath is simple, just gather the right supplies, seasonal embellishments, and a dash of creativity. In this detailed guide, we will explore how to make a DIY bow and wreath in classic style to celebrate the seasons and holidays from spring flowers, fall harvest, and Independence day to Halloween, Thanksgiving, and Christmas!
Watch this Facebook Live as Nick from Nick’s Seasonal Décor shares the Ultimate guide on how to make a DIY bow and wreath in simple step-by-step instructions. Grab your bow-making tools and let’s get started!
Double Ribbon Bow (Starts at 1:30)
Materials required:
- 100-yard Bowdabra bow wire
- Large Bowdabra
- Polka Dotted Blue Ribbon Roll
- Burlap Blue Ribbon Roll

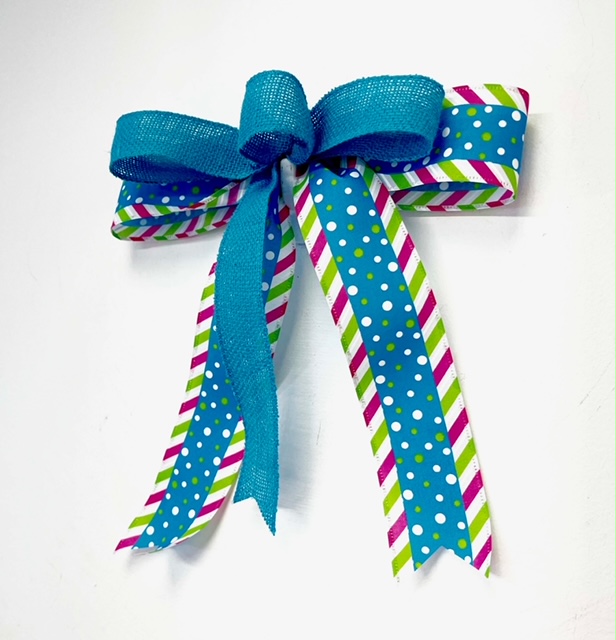
DIY Double Ribbon Bow
Process:
- Nick folds the bow wire in half and tucks it underneath the Bowdabra.
- He places the polka-dotted blue ribbon inside and creates two loops with two tails on the Bowdabra.
- Then, he takes the blue burlap ribbon, flips it inside out, places it on the Bowdabra, and creates two comparatively smaller loops and one button loop.
- He secures the bow with several wire knots in the back and finishes off by fluffing the loops and cutting the dovetail pattern on the tail ends.
DIY Funky Bow (Starts At 5:18)
Materials required:
- 100-yard Bowdabra bow wire
- Large Bowdabra
- Lemon Printed Burlap Ribbon Roll (Beige)
DIY Funky Bow
Process:
- Nick folds the bow wire in half and tucks it underneath the Bowdabra.
- He creates one loop with the lemon-printed burlap ribbon, cuts it off, and places it right into the Bowdabra.
- In the same fashion, he creates 4 more loops on the Bowdabra.
- He secures the bow with several wire knots in the back and finishes off by fluffing the loops and cutting the dovetail pattern on the tail ends.
Lemon Printed Burlap Ribbon Bow (Starts At 10:45)
Materials required:
- 100-yard Bowdabra bow wire
- Large Bowdabra
- Lemon Printed Burlap Ribbon Roll (Beige)
Lemon Printed Burlap Ribbon Bow
Process:
- Nick folds the bow wire in half and tucks it underneath the Bowdabra.
- After cutting off the tails long from the lemon ribbon roll, he places them right into the Bowdabra.
- He places the ribbon in, leaves a little bit of overhang, and creates 2 loops (4”) on each side of the Bowdabra.
- Next, he creates 4 comparatively smaller loops (2 ½”) and creates 1 button loop.
- He secures the bow with several wire knots in the back.
- He finishes off by fluffing the loops and cutting the dovetail pattern on the tail ends.
DIY Bow Wreath (Starts at 14:45)
Materials required:
- 100-yard Bowdabra bow wire
- Large Bowdabra
- 1 ½” Blue Burlap Ribbon Roll
- Grapevine Wreath
- Blue Lavender Stem with Leaves Sprays/Picks
- Red/White Curly Picks (6)
- Hot Glue
DIY Bow Wreath
Process:
- Nick folds the bow wire in half and tucks it underneath the Bowdabra.
- After cutting off tails from the blue burlap ribbon roll, he places them right into the Bowdabra.
- He takes the ribbon, flips it inside out, places it on the Bowdabra, and creates 12 loops.
- He secures the bow with several wire knots in the back and finishes off by fluffing the loops and curling up the tails.
- In the end, he sticks the bow securely to the wreath and adds some blue lavender stem with leaves sprays, and 6 pieces of red/white curly picks with hot glue.
Simple Bow-Tie (Starts At 27:58)
Materials Required:
- 100-Yard Bowdabra Bow Wire
- Mini Bowdabra
- Green Burlap Ribbon Roll
Simple Bow-Tie
Process:
- Nick folds the bow wire in half and tucks it underneath the Bowdabra.
- After cutting off the tails (8”) from the ribbon roll, he places them into the Bowdabra.
- He takes the ribbon, flips it inside out, places it on the Bowdabra, and creates 2 loops on the Bowdabra and 1 button loop.
- Then, he pulls the bow wire from one end to the other and ties the bow.
- He finishes off by fluffing all the loops and cutting the dovetail pattern on the tail ends.
Please join us on Mondays at 4:00 p.m. PST, 5:00 p.m. MST, 6:00 p.m. CST, and 7:00 p.m. EST each week for another fun Facebook live.
Did you miss any Facebook lives? You can find DIY decor bows and more at the Bowdabra blog!
