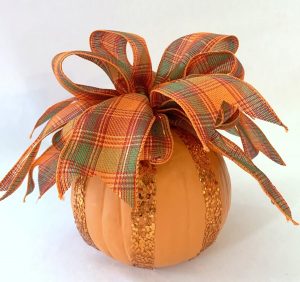
Materials:
Ribbon – 3/4″ and 2.5″
Bowdabra tool and wand
Bowdabra bow wire
Pumpkin
Hot glue
How to beautify a pumpkin with a Bowdabra bow
Instructions:
First, let’s begin by making the bow using the Bowdabra! Fold a 24″ piece of Bowdabra wire in half and lay it in the Bowdabra, tucking ends under. Cut a 24″ piece of 2.5″ ribbon – measure 8″ for the tail and make a crease in the middle, placing the ribbon at the crease markdown into the center of the Bowdabra. To make a loop, fold over and make a crease into the ribbon creating a five-inch loop and press into the Bowdabra.
Next, fold the other side at the same width creating another loop. Ribbon tails should appear opposite.
Cut another strip of ribbon, 24″ long, and repeat steps for making 5″ loops on each side with tails. Scrunch the ribbons down with the Bowdabra wand.
Continue making separate bows and tails, scrunching down and you make them until . . .
Be sure to alternate the loops and tails as you make them. Scrunching down each time.
For this bow, five sets of loops and tails are made for a total of 10 for each.
Finishing your embellished pumpkin
While the bow is still in the Bowdabra, thread the two loose ends of the Bowdabra bow wire through the loop at the other end.
Pull the Bowdabra bow wire tightly while the bow is still in the Bowdabra and gently pull the bow out of the Bowdabra. Separate the loose wire ends and take them around to the back of the bow and tie in several knots to secure. Cut off excess wire.
Measure the 3/4″ glitter ribbon around one side of the pumpkin and cut a total of six strips to glue on top and bottom evenly spaced around the pumpkin. Fluff and straighten the loops and tails of the bow. Next, glue to the center of the pumpkin using hot glue. Dovetail the ribbon ends by folding the end ribbon together and cut at the fold on an angle down to the opposite ribbon edge.
Use the dovetail ends of the bow ribbon to frame the pumpkin . . .
for a lovely decorative effect!