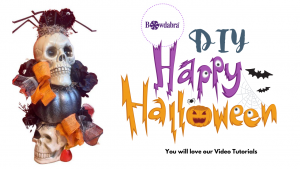
Bowdabra designer, Joette is here today to show you how to make this adorable Halloween topiary with Bowdabra

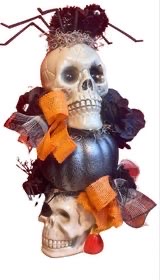
Spooky Halloween topiary
Supplies:
- Bowdabra
- Bowdabra Wire
- 3-4 yards of 1″ wide ribbon (color of choice)
- 1-2 yards of 6″ wide Dollar Tree mesh (color of choice)
- Foam Block (Dollar Tree)
- Hot Glue
- 1 Skewer Stick
- Black Spray Paint (Silver Optional to add a 2 tone look)
- Spanish Moss (Can be found at Dollar Tree)
- 1 Plastic Skull from Dollar Tree
- 1 Orange Foam Pumpkin from Dollar Tree
- Party Decor Spider from Dollar Tree
- Black Rose Bush with eyeballs from Dollar Tree
- *Skull Mug or vase (This mug was found at a Thrift Store.)

Instructions:
Note: You can substitute the mug by using a second plastic skull from Dollar Tree.
First, insert a tiny hole in the top of the skull for the skewer stick to be able to pass through. Then, hot glue the flowers to the side of the skull instead of planting them into the foam in the mug. Or, place the pumpkin as the base and stack the skulls on top of each other. You may find it’s more stable with the pumpkin as the base. l like the weight of the mug for the base, it makes this piece nice and sturdy. Just be creative and have fun… There’s no wrong way, as long as it’s not top-heavy.
Now, secure skewer stick into the top skull. Hot glue foam into the mug. Paint orange foam pumpkin (if desired). Line up the layers to how you want them, I like mine facing different directions and staggered.
Next, drive the skewer stick skull through the pumpkin, and all the way down into the bottom foam. Add the Spanish moss between the layers and hot glue everything in place. Now it’s time to decorate!
Decorate your Halloween topiary
Cut the flowers free from the bush and place a few on the bottom left-hand side. Next, place a few more of the flowers up a tier to the right-hand side. I needed 2 more blooms for the 2 bows, but only had one left, so I used a felt rose that I had found at a thrift store. (I saved my last eyeball rose for the top bow, which is seen more than the lower bow.)
Make the bows
Using the Bowdabra, make 2 smaller size bows from a 1″ width ribbon, spiky bow style. I only added 3 loops, but three loops with 9 tails. This is done by pre-cutting the ribbon into 12″ strips (for this craft) and placing them into the Bowdabra like the shape of an awareness ribbon.
Then, I used about a 12″-15″ strip of mesh in the scrunchy bow style method. Hot glue the felt flower in the center of one bow and build the eyeball rose in the bow on the other. (Always remember to fluff and shape your bows.)
Attach the 2 bows opposite of the flower clusters but not exactly even with the clusters. Keep the staggered look flowing. (You don’t want to cover up any of the skull faces, but you also don’t want to hide your bows and flowers. Find that perfect placement before you secure anything with hot glue.) Now, tie the bows on the piece using the Bowdabra wire. Also add a dab of hot glue for extra security. Lastly, hot glue the spider to the top skull and use a small amount of Spanish moss to hide the glue and mechanics.
That’s all there is to this project… Hope this helps you with creating some Spooktacular Halloween fun!
