Give a warm welcome to the sunniest season of the year by decorating your home with DIY summer bows and wreaths. Warm weather months are indeed special, so why not celebrate them in style with one of the following summer bows and wreaths to dress up your front door?
No matter what design look you’re searching for, chances are you’ll find it here. We’ve assembled a brightly colored floral wreath and some beautiful bows. Learn how to create a DIY summer wreath and bows with Bowdabra in few minutes!
Watch Nick from Nick’s Seasonal Décor on Bowdabra Facebook Live to learn how to Build DIY Summer Wreaths and bows from the scratch!
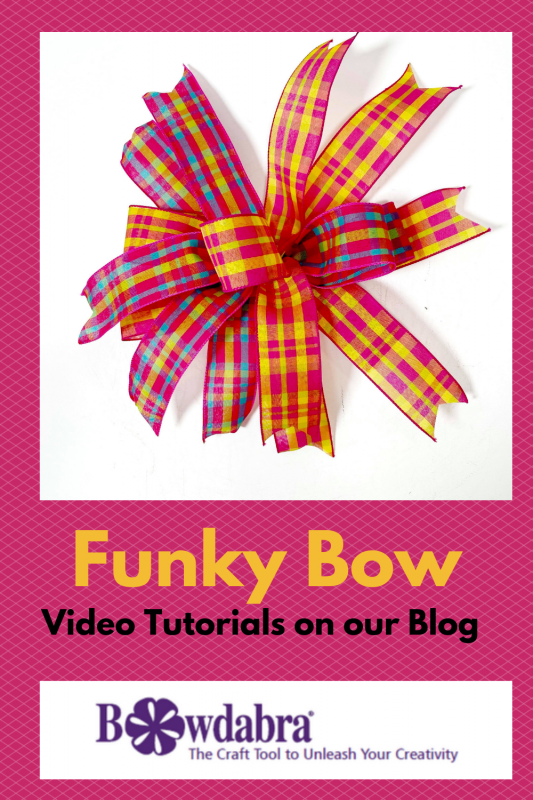
DIY Funky Bow (Starts at 1:48)
Materials required:
- 100-yard Bowdabra bow wire
- Large Bowdabra
- Blue-Pink-Gren Plaid Ribbon Roll
- Orange-Pink-Yellow Plaid Ribbon Roll

Funky Bow
Process:
- Nick folds the bow wire in half and tucks it underneath the Bowdabra.
- He creates one loop, two tails with the blue-pink-green plaid ribbon, cuts it off, and places it right into the Bowdabra.
- He creates one loop, two tails with the orange-pink-yellow plaid ribbon, cuts it off, and places it right into the Bowdabra.
- Again, he takes the blue-pink-green plaid ribbon and places the tail in, twists the Bowdabra, makes 1 loop, and cuts it off.
- He takes the orange-pink-yellow plaid ribbon and places the tail in, twists the Bowdabra, makes 1 loop, and cuts it off.
- In the same fashion, he creates more 2 loops with the blue-pink-green and orange-pink-yellow plaid ribbon alternatively.
- To secure the bow, he pulls the bow wire from one end to the other and makes slip knots.
- He finishes off by fluffing the loops and cutting the dovetail pattern on the tail ends.
DIY Traditional Bow (Starts at 7:55)
Materials required:
- 100-yard Bowdabra bow wire
- Large Bowdabra
- White-Blue-Yellow chequered ribbon roll
Traditional Bow
Process:
- Nick folds the bow wire in half and tucks it underneath the Bowdabra.
- After cutting off the tails from the White-Blue-Yellow chequered ribbon roll, he places them right into the Bowdabra.
- He takes the end of the ribbon, places it upside down in the Bowdabra, and creates 11 loops to give it a traditional bow design.
- To secure the bow, he pulls the bow wire from one end to the other and makes slip knots.
- He finishes off by fluffing the loops.
DIY Bow Wreath (Starts at 12:17)
Materials required:
- 100-yard Bowdabra bow wire
- Large Bowdabra
- Green ribbon roll
- Hot glue
- 14” Grapevine wreath
- White and Yellow flower decorative picks
Bow Wreath
Process:
- Nick folds the bow wire in half and tucks it underneath the Bowdabra.
- After cutting off the tails from the green ribbon roll, he places them right into the Bowdabra.
- He creates one loop (3 ½”) with two tails (6-8”) on either end, cuts it off, and places it right into the Bowdabra.
- Again he creates one loop with the same ribbon, cuts it off, and places it right into the Bowdabra.
- He repeats the process thrice with the green ribbon and creates a total of 5 loops on the Bowdabra.
- He secures the bow with several wire knots in the back and finishes off by fluffing the loops and cutting the dovetail pattern on the tail ends.
- In the end, he sticks the bow securely with hot glue to the wreath and adds some white and yellow flower decorative picks.
Blue-Red-White Ribbon Bow (Starts at 22:40)
Materials required:
- 100-yard Bowdabra bow wire
- Mini Bowdabra
- 2 ½” Blue-Red-White Ribbon Roll
Blue-Red-White Ribbon Bow
Process:
- Nick folds the bow wire in half and tucks it underneath the Bowdabra.
- He takes the end of the blue-red-white ribbon tail, places it, and creates 8 loops on the Bowdabra.
- To secure the bow, he pulls the bow wire from one end to the other and makes slip knots.
- He finishes off by fluffing the loops and cutting the dovetail pattern on the tail ends.
A Simple Bow (Starts at 26:30)
Materials required:
- 100-yard Bowdabra bow wire
- Mini Bowdabra
- Black and White Striped Ribbon Roll
A Simple Bow
Process:
- Nick folds the bow wire in half and tucks it underneath the Bowdabra.
- After cutting off the tails from the black and white striped ribbon roll, he places them right into the Bowdabra.
- He creates 3 big loops on either side of the Bowdabra using the black and white striped ribbon.
- Using the same ribbon, he creates 2 loops (2 ½”) on either side of the Bowdabra and 1 button loop.
- He secures the bow with several wire knots in the back and finishes off by fluffing the loops.
Create DIY Wreath and bows with Bowdabra: Pro Tips for Wreath Makers
Please join us on Mondays at 4:00 p.m. PST, 5:00 p.m. MST, 6:00 p.m. CST, and 7:00 p.m. EST each week for another fun Facebook live.
Did you miss any Facebook lives? You can find DIY decor bows and more at the Bowdabra blog!
