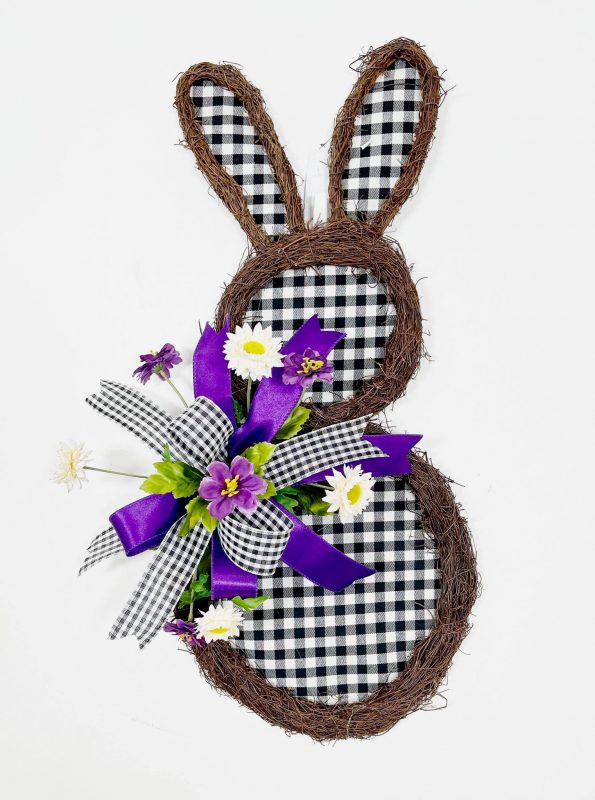
There is no better gift topper than a decorative bow! Pre-made bows are expensive. Therefore, it is better to DIY! You can also choose the ribbon and color scheme yourself to make your holiday decorations extra special. If you’ve ever wondered how to make a DIY bow or an Easter bunny wreath like you see on the internet, look no further!
Watch Nick from Nick’s Seasonal Décor on Bowdabra Facebook Live, with funky and traditional bows, and a wreath. Follow the step-by-step instructions and create beautiful classic DIY bows and Bow wreath. Tune in to learn the process from scratch!
A Gorgeous Easter Bunny wreath (Starts at 2:40)
Materials required:
- 100-yard Bowdabra bow wire
- Large Bowdabra
- Purple ribbon roll
- Gingham ribbon roll
- Hot glue
- Bunny Grapevine wreath
- Flower decorative picks
- Little scrap pipe cleaner

Easter Bunny grapevine Bow wreath
Process:
- Nick folds the bow wire in half and tucks it underneath the Bowdabra.
- He creates 1 loop from the purple ribbon roll, cuts it off, and places it right into the Bowdabra.
- Using the gingham ribbon, he creates 1 loop, cuts it off, and places it right into the Bowdabra.
- In the same fashion, he creates 1 more loop with the pink ribbon roll and 1 more loop with the green ribbon rolls alternatively.
- He secures the bow with several wire knots in the back and finishes off by fluffing the loops and cutting the dovetail pattern on the tail ends.
- He takes a little scrap pipe cleaner and secures it to the back of the bow & creates a knot.
- In the end, he sticks the bow securely with hot glue to the bunny wreath and adds some flower decorative picks.
Voila! You made a Bunny Bow Wreath!
A Traditional Bow with Chequered Ribbon (Starts at 7:27)
Materials required:
- 100-yard Bowdabra bow wire
- Large Bowdabra
- Chequered ribbon roll
Traditional bow with Chequered Ribbon
Process:
- Nick folds the bow wire in half and tucks it underneath the Bowdabra.
- After cutting off the tails (22”) from the chequered ribbon roll, he places them right into the Bowdabra.
- He creates 7 loops on the Bowdabra to give it a traditional bow design.
- He secures the bow with several wire knots in the back and finishes off by fluffing the loops and cutting the dovetail pattern on the tail ends.
A Little Flower Bow (Starts at 11:49)
Materials required:
- 100-yard Bowdabra bow wire
- Mini Bowdabra
- Pink ribbon roll
- Green ribbon roll
Process:
- Nick folds the bow wire in half and tucks it underneath the Bowdabra.
- To create the flower leaves, he cuts two lengths around 5½” – 6” from the green ribbon roll, folds them and cuts the reverse dovetail pattern on the tail ends, and places them right into the Bowdabra.
- To create the flower petals, he cuts two lengths around 3” from the pink ribbon roll, folds them, and cuts the reverse dovetail pattern on the tail ends, and places them right into the Bowdabra.
- He secures the bow with several wire knots in the back and finishes off by fluffing the loops.
DIY Burlap Ribbon Bow (Starts at 16:04)
Materials required:
- 100-yard Bowdabra bow wire
- Large Bowdabra
- Burlap ribbon roll
Burlap Ribbon Bow
Process:
- Nick folds the bow wire in half and tucks it underneath the Bowdabra.
- After cutting the tails, he places the Burlap ribbon right into the Bowdabra.
- Using one ribbon, he creates 3 loops (4”), 2 loops (2½”) on either side of the Bowdabra, and 1 button loop.
- He pulls the bow wire from one end to the other and ties the bow.
- He finishes off by fluffing all the loops and cutting the dovetail pattern on all the tail ends.
Traditional-Funky Sky Ribbon Bow (Starts at 25:22)
Materials required:
- 100-yard Bowdabra bow wire
- Large Bowdabra
- Sky-Blue ribbon roll
Traditional-Funky Sky Ribbon Bow
Process:
- Nick folds the bow wire in half and tucks it underneath the Bowdabra.
- After cutting off the tails, he places the sky-blue ribbon right into the Bowdabra.
- He creates one loop from the sky-blue ribbon roll, cuts it off, and places it right into the Bowdabra.
- In the same fashion, he creates 3 more loops with the same ribbon roll.
- He secures the bow with several wire knots in the back and finishes off by fluffing the loops and cutting the dovetail pattern on the tail ends.
DIY Gift Bows and Bow wreath with Bowdabra