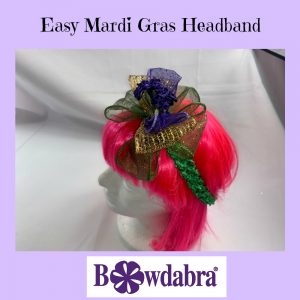
In this all-new, Bowdabra video Sandy Sandler, the creator of Bowdabra shows you how easy it is to make an adorable Mardi Gras headband in literally minutes. You may want to make more than one since it is a perfect gift or party favor! You can become an expert Bowmaker with Bowdabra and make bows for parties, gifts, and bazaars. Visit the Bowdabra blog for more tutorials and video DIYs for weddings, package decorations, decor and more!

Materials:
2” x 26” Green Ribbon
2” x 13” Gold Ribbon
2.5” x 11” Purple Sparkle Ribbon
Dozen Purple Rose Stems
Green Headband
“Hi, I’m Sandy Sandler, the creator of the Bowdabra Bowmaker. Today, I’m going to show you how to make this adorable Mardi Gras headband. I create it in just really fun Mardi Gras colors, but of course, you can change the colors and make it for any season you want. So, let’s get started.
Okay, so we’re going to get started by taking my Bowdabra Bow Wire, I’m going to make it long enough so that I can fold it in half and tuck the ends underneath my Mini Bowdabra. I don’t attach it to anything and just tuck it underneath.
Next, what I’m going to do is take my green sparkle ribbon and I’m going to just fold it in half so that we have equal lengths. So now, I fold it in half, and then I’m going to take the right side of the ribbon and put that down into my Mini Bowdabra.
Then, I’m going to fold this ribbon over, and I’m going to make a loop, take the right side of my ribbon and do what I call a mountain-up and scrunch that in. So then, I have one loop. Now, I’m going to take the bottom strand of ribbon, fold it over. Again, I’m going to take the right side of the ribbon and I’m going to do this. I make a little mountain in the middle and scrunch that into my Mini Bowdabra. Next, I’m going to do exactly the same thing. On the under loop, I’m going to just do a little mountain and scrunch that. That means it gives us the crease we want so we don’t have to sew. And finish off by doing exactly the same thing.
Now, I have four equal loops. Then, I’m going to take my gold ribbon and I’m going to take the right side, put that down into my Mini Bowdabra. I’m going to fold this back around and then take the right side and scrunch that into the Mini Bowdabra. Next, I just go to the center and scrunch that in. Now, finding the center sometimes is easier if you have the Bowdabra Hair Bow Tool, but I’m not using that today.
I’ll take the right side of the ribbon and do the exact same thing and scrunch that in. Then, I’m going to fold it around take the right side of the ribbon and put that down into my Mini Bowdabra. Now, I’m going to just go to the center, do a little mountain-up there and push everything down.
Next, I have this cute little bouquet of roses. We’re just going to put the stems right down in the center. And take my wand, I’m going to just scrunch everything down.
Finally, I’ll take my Bowdabra Bow Wire. I’m going to pull this through, pull it tight while it’s still in the Mini Bowdabra. I’m going to separate the ends and bring them around to the back. And I’m just going to tie a knot and then tie another knot.
This is super simple. To finish, I’m going to take my headband, and what I’m going to do with my headband is, the trick that I use is I take the wire and I find the seam. So, I take the wire and I just thread it through on one side of the seam and then thread it back through on the other side of the seam. And so, this way, the wire isn’t against a little girl’s head. So, I’m just going to knot that and I’ll double-knot it. And just clip the ends like that. And now, I’ll shape out my bow so I have my loops, and I used a wired ribbon, but you could definitely use a grosgrain. Now, I’m just going to bring my bunches of roses right to the center. And you have this super simple to make headband.
So, I hope you enjoyed this video. Please, share and subscribe to our YouTube channel. Thanks so much for watching, and I’ll see you in the next video.”