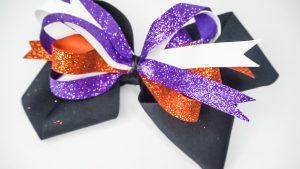
Hey everyone! I’m Simply Shalese here to make something awesome with you guys!
Today we will be making adorable Halloween hair bow. This hair accessory is perfect for both kids and pets. So, let’s get started!
Hair Clip
2 ¼ in wide black grosgrain ribbon – 22 inches long (2 pieces)
5/8 in wide orange glitter ribbon – 34 inches long (1 piece)
5/8 in wide purple glitter ribbon – 34 inches long (1 piece)
5/8 in wide white grosgrain ribbon – 34 inches long (1 piece)
3/8 in wide black ribbon – 4 inches long (2 pieces)
Scissors
Hot Glue Gun
Lighter (optional)
First, I fold my bow wire in half and place it in the center of the Bowdabra. I usually use about 14 inches or so. Make sure you have enough to tie the bow at the end. The lighter is optional but I sometimes use it to finish off any frayed edges before beginning.
I start with the thickest ribbon. So, I take one piece of my 2 ¼ in black ribbon and I scrunch one end and place it down on the Bowdabra. Instead of just making a loop and scrunching the other side, I’m going to first twist the ribbon two times before I scrunch the other end and place it on the Bowdabra. Doing this will just give the bow extra loops. You do have the option of skipping this part and just making a regular loop if you choose to do so. Once both ends are scrunched in the Bowdabra, find the center of the ribbon and scrunch it down as well. Repeat this step with the second piece of black ribbon.
The next thing you’re going to do is take your orange ribbon and fold it in half then fold it into thirds. Now, unfold the ribbon and find the center. Scrunch the center down onto the Bowdabra. Then, repeat this step with the purple and white ribbon.
After all three pieces are in place, starting with the orange ribbon, find the next crease and scrunch the ribbon down into the Bowdabra. Do this with both sides of the orange ribbon. Repeat this step with the purple and white ribbon as well. Use the creases you made when folding the ribbon into thirds to help guide you.
Don’t forget to use your wand frequently to help scrunch everything together.
Give your bow one last scrunch and while the wand is in place you can adjust the bow as much as you’d like. Then remove the wand and bring the bow wire together. Bring the two open ends inside the looped end. While one hand is holding the bow in place, use the other hand to pull the bow wire taut. Then carefully remove the bow. Tie the bow wire in several knots and cut away any excess.
Then, take one of the 4 inch long pieces of ribbon and tie it in a loose knot. Finally, use your hot glue gun to glue the ribbon to the center of the bow and all the way around the center. The two ends should meet at the back of the bow.
Take your hair clip, place glue on the inside of the clip and place the other 4-inch ribbon on the incline. Next, add glue to the back of the ribbon and place the ribbon over the glue. Lastly, add glue to the inside of the clip and smooth the last bit of ribbon in place. Remove any excess glue you may have. Add glue to the back of the clip where the ribbon was just placed and attach it to the back center of your bow. Press firmly for a few seconds.

You have the option of ribbon-cutting the end of the orange, purple and white ribbon. To do this, fold the ribbon in half longways. Keep the open ends at the bottom and the fold at the top. Then cut at a diagonal across the ribbon. I think this is an adorable final touch, however, but it is completely optional. And you are all done with your adorable Halloween hair bow!
Thanks for joining me! Be sure to check out and subscribe to my youtube channel, Simply Shalese, for more awesome videos! Also, follow me on Instagram at SimplyShalese_diy! And check out Bowdabra Blog for more awesome videos!