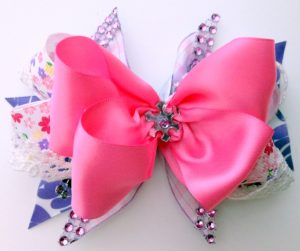

At first, I thought the bow couldn’t be made with a Mini Bowdabra since there were lots of ribbon used and I thought too bulky for the mini. But guess what, I did it! In fact, I tried it both ways and the Mini Bowdabra is the way to go! The key is to use the Mini Bowdabra Wand to hold the ribbon down.
Stacked Boutique Bow
Materials needed:
Mini Bowdabra
Hair Bow Tool & Ruler
Bowdabra Bow Wire
1 – 6.5″ long 2.5″ wide satin ribbon
2 – 5″ long 2 1/4″ satin ribbon
Lighter flame
Rhinestone Mesh/fabric glue
24″ long 3/4″ wide lace trim
23″ long 7/8″ wide grosgrain ribbon
23″ long 1.5″ wide satin ribbon
Decorative center trim
Elastic baby headband
Instructions:
Begin by placing the Hair Bow Tool & Ruler on top of the Mini Bowdabra. Cut 18″ of Bowdabra Bow Wire, folding in half and placing into the Mini Bowdabra, tucking ends under.
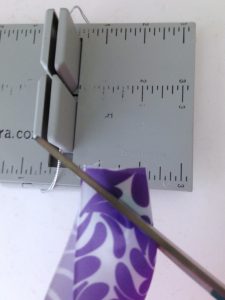
First make a spike ribbon by cutting 6.5″ of satin ribbon and dovetailing the ends by folding the ribbon in half, folding again length-wise. Next, make a slant cut from the fold, down to the corner edge creating dovetails on both ribbon ends. Seal ends.

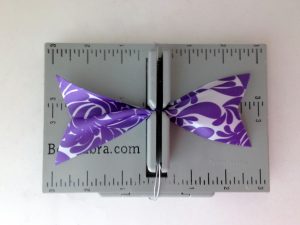
Then, crease the middle of the spike ribbon and insert into the Mini Bowdabra.

Next, cut two 5″ – 2 1/4″ wide spike ribbons, dovetailing the ends and sealing using lighter flame. Then cut two rows of rhinestone mesh, slightly longer than the length of the “V” dovetail.
Glue in place using fabric glue, as pictured, cutting off excess mesh once dry.
Next insert the spike ribbon into the Mini Bowdabra, one strip at a time, criss-crossing.
Then, cut 24 inches of lace trim, folding in half and creasing in the middle. Insert into the Mini Bowdabra.
Next, take one end of the trim and loop around over the Mini Bowdabra tower and down into the slot.
Take the other end over and down into the Mini Bowdabra creating an “X” or criss-cross with the trim.
Next, take the bottom trim loop and twist away (from you), pressing down into the Mini Bowdabra, then take the top loop, twisting away and down into the slot. Use the Mini Bowdabra Wand to help keep the ribbon and trim down in the Mini Bowdabra.
Take another ribbon, this time, 7/8″ wide and 23 inches long, and follow the previous steps.
Since this ribbon is slightly shorter than the trim, the loops on each side should tuck into the loops of the trim when fluffing. Be sure to use the Mini Bowdabra wand to scrunch down and hold the ribbon in place while you’re making the bow.
For the last ribbon, cut a 23″ length 1.5″ wide ribbon, sealing ends. Crease one end and place down into the Mini Bowdabra. Next, make a loop slightly shorter than the previous ribbon loop and place into the slot. Next, fold the other side into a loop the same width, leaving a tail.
Fold ribbon tail into loops, one at a time down through the center of the Mini Bowdabra, making two more loops on each side. Scrunch down with the Mini Bowdabra Wand.
While the bow is still in the Mini Bowdabra, push the two loose ends of the wire through the loop, pulling tightly. Gently pull the bow out, separating the wires around to the back and tying in a knot, cutting off excess bow wire.
And finally, glue on a decorative trim in the center, and fluff bow.
This is the perfect boutique bow to attach to a baby headband! How adorable! If you would like to see more amazing bows like this one by Bowdabra designer Gail at Purple hues and me be sure to visit Bowdabra blog each week.