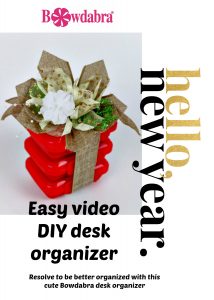
The New Year brings resolutions of all kinds. Many of you resolve to be better organized in the New Year. This cute little decorative desk organizer is the perfect thing to get that messy desk in order.
Watch as Bowdabra creator, Sandy Sandler shows you step by step how to make a decorative desk organizer in no time that will keep your supplies neatly in order. So, that’s one resolution down, many more to go.

Decorative desk organizer
Materials:
(4) 1.5” x 7” Burlap Ribbon
Burlap Ribbon cut to size of boxes
1.5” x 5” Green Mesh Ribbon
(5) 1.5” x 5” Gold Polka Dot Ribbon
(3) Plastic Organizing Boxes
Small Floral Pick
Liquisilk or Adhesive Dots
Now we’re going to make this cute little decorative desk organizer.
To start, I’ve already filled these containers with, one is candies, another has paper clips, and then we have the rubber bands. And just close them up. And I wrapped this ribbon already around it, because this can literally stay on somebody’s desk, and they can just pull it in and pull it out, so it looks really pretty. So now I’m going to set this aside.
So, I’m going to start by taking my Bowdabra Bow Wire, I’m going to fold it in half and just lay it down into my Mini Bowdabra. And I tuck the ends underneath.
Now the way that we make flowers in the Bowdabra is, if you want a pointed tip, all you do is fold your ribbon in half and just clip from the corner to the fold inwards. And then if I want to make my petal and make it a curved, all I do is just cut a little semicircle at the top of my ribbon. And I’m using a wired ribbon because that makes it a little bit easier to shape.
Make the flower bow
So, I’m going to just take this, I’m going to fold it in half to find my center. I’ve already cut all the ends the way that I want them. Let me put this one in. And I love making these flowers in the Bowdabra because you can really use any color, and all you have to do is cut the leaves and the petals the shape that they would be in your flower. So, just take this and push that down into the Bowdabra, and just push that in. Again, I’m just kind of shaping a little bit as I go. I’m going to take my wand and just really scrunch everything down. And take this and put that in there, and this here. Then, I take this one and just kind of scrunch that down.
I take my wand, push everything in. And then I’m going to add my little flower there. And take my Bowdabra Bow Wire, pull it through the slipknot while it’s still in the Bowdabra, hold my bow down, and pull it really tight. So now, when I take it out, all I have to do is bring the ends around to the back, tie a knot, and tie a double-knot.
Finishing your organizer
To finish, I’ll bring back my box here. And actually, let’s shape this. I like to shape it by bringing all the petals up to the top and then moving them around. After I finish shaping I tie it onto my box. So, this way, somebody has a really pretty flower that just sits on their desktop, or on their bookshelf, and they have their supplies that they can just pull in and out. Then clip this underneath here. Now you have a great little hostess gift that gets somebody started with their New Year’s organizing.
Please do me a favor and click the Subscribe button below, and also, like us at Bowdabra on Facebook.”