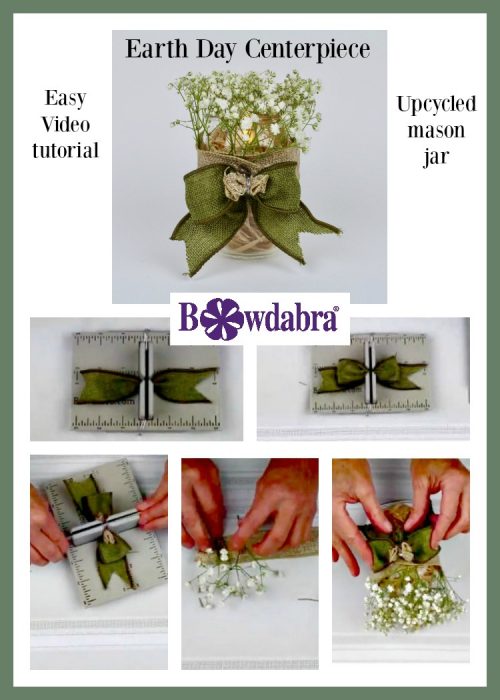
Earth Day is April 22 this year and to celebrate we’ve made this elegant Earth Day centerpiece. It such a nice addition to the décor of any parties, weddings, and more! Watch and follow along in this quick and easy video tutorial by Bowdabra creator Sandy Sandler as she makes the upcycled earth Day centerpiece.

Earth Day centerpiece
Materials
- Mini Bowdabra
- Bowdabra Bow Wire (18″)
- Plain Burlap Ribbon (1 1/2″ x 1′)
- Green Burlap Ribbon (1 1/2″ x 1′)
- Raffia
- Mason Jar
- Electric Tea Light Candle
- Baby’s Breath Bouquet
- Scissors
- Hot Glue
“Now we’re going to make this really cute Earth Day centerpiece. I’m going to start with my Mini Bowdabra and my Bowdabra Hair Bow Tool and Ruler. And this just slips right over the Mini Bowdabra. I’m going to fold my wire in half and just tuck my Bowdabra Bow Wire underneath the Mini Bowdabra so it stays out of the way.
Make the Bowdabra bow
Then what I’m going to do is making my bow first. I’m going to put my burlap right in here, and I’m going to just measure it so it fits. There we go. So, we’re at about three inches away on each tail. Then what I’m going to do is I’m going to make this just like we make our hair bow. So, I’m going to scrunch this in here. I’m going to fold it over, tuck this piece under, and put that into my Bowdabra.
Then what I’m going to do is measure out about 1 1/2 inches on each side, and that’s my center. And I’m just going to put that down into my Mini Bowdabra. Next, I’m going to take this little piece of burlap and scrunch it in so that it matches the burlap that I’m going to use in our centerpiece.
Finish the bow
Now I’m going to just scrunch all that down, take my Bowdabra Bow Wire, pull the two ends through the slipknot, pull it really tight while it’s still in the Bowdabra. I pull it out, separate my ends, pull it really tight, and then bring it around to the back. And I’m going to just tie it off and tie a knot. And I’m going to just clip this right up at where I tied it.
So I’ll just fluff my bow a little bit, bring the ends down and fluff the loops, and take my little scrunchie burlap and kind of make a little like flower sort of in the center. Then I’m going to put this off to the side, and I’m going to take a piece of burlap that’s measured to fit around my Mason jar. So, if you were using a bigger Mason jar, then you would want a bigger piece of burlap.
Adding the Baby’s breath
And I’ve already cheated and I’ve stuffed this full of raffia, and then I’m just going to put my jar aside. What I’m going to do now, with this piece of burlap is to glue baby’s breath onto the burlap. And the key is you want the top to be about the same sizes. So, I’m just going to add some glue.
Now this is on the back of my burlap. So, I’m going to just glue the baby’s breath. You could use fresh baby’s breath, or you could use dried. It doesn’t matter. And you just have to hold this down. And just make sure that the glue is dry and the baby’s breath is stuck to the back of your ribbon. Now just so that you don’t have to watch me do the whole thing, I’m going to take my Mason jar and move my Mini Bowdabra out of the way.
And now what I’m going to do is I want the baby’s breath to come right up above. So, what I’ll do is I’m going to put a line of glue here. And then I want to make sure that I have the stems of the baby’s breath against the jar. So, I’m going to just glue this here. And just to make it a little bit stronger, I’m going to put some glue also around the Mason jar as I wrap this around.
Finishing the Earth Day centerpiece
What’s really nice is we did this sort of as an Earth Day project, but depending on what you’re celebrating, it would be wonderful for a rustic wedding. Actually it could be great for pretty much anything. You can change the flowers and use lavender. So, it doesn’t have to be baby’s breath, but I just love the way the baby’s breath looks.
Now what I’m going to do is just dab a little bit more glue here. Next what I’m going to do is take my bow that I already made and I’m just going to glue it on the front. Again, put a generous amount of glue here. I’m gluing it right over where the seam is. Oh, and one last step, which is that I’m going to turn on the battery powered tea light. Obviously, you don’t want to use a real candle when we have raffia. And just put this in, and it will illuminate and give you a really, really pretty centerpiece.
Subscribe to our YouTube channel so that you can see our new videos when they come out, and don’t forget to like us on Facebook.”
