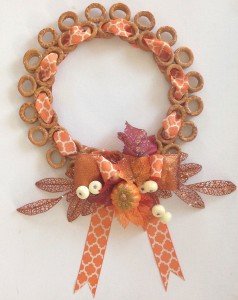
Looking for something to make for a craft fair or bazaar? Here’s an idea . . .
My family loves eating pretzels as a snack. Recently we made the mistake of buying a huge container of “organic” wheat pretzels from a warehouse club store that were down right nasty. No one would eat them especially since they smelled bad when you took off the lid.
Not wanting the pretzels to go to waste, I had an “ah ha” moment. Why not make a wreath out of the pretzels? Pretzel wreaths are an old time favorite for bazaars, craft fairs and fundraisers. They are so easy and simple to make. And the best part, they can be decorated with any seasonal or holiday embellishments, ribbon, and of course, Bowdabra bows.
To make, you will need:
Pretzels
Parchment or waxed paper
White glue/super glue
Clear sealer/varnish spray
Ribbon
Embellishments
Bowdabra and wand
Bowdabra Bow Wire
Additional materials include a pencil, scissors, and a lighter to seal the ribbon ends.
To begin, most pretzels are shaped into a loopy knot with three holes. But these pretzels were plain circles so I glued them together with white glue in groups of three and let them dry.
After drying, draw a circle the size of the wreath you want on parchment or wax paper, arranging the three ring pretzels around the circle (I had ten sets of three) and gluing the sides of the pretzels together.
Next, to fortify the wreath, glue on additional pretzel sets and circle pretzels overlapping the first row so that you have a second row of glued-on pretzels.
It takes a while for the white glue to dry clear and hot glue does not stick to the pretzels, so to speed things up, I used super glue to glue the pretzel groups together. Worked out great!
Then, I sprayed the plain pretzel wreath outside with a clear sealer, three times, front and back in every nook and cranny, and allowed it to dry between coatings and then, overnight.
To decorate:
Loop ribbon through the openings in the wreath, starting at the bottom, weaving the ribbon under and over.
Once you finish weaving, dovetail the ends of the ribbon by folding together and cutting at a 45 degree angle on the fold. Seal the ends by running over a flame.
To make the decorated Bowdabra bow:
Fold a 15 inch of Bowdabra wire together and place into the Bowdabra, tucking the ends under.
Add leaf embellishments into the opening of the Bowdabra. Then fold a 16 inch length of wired ribbon together with ends meeting and next layer a slightly smaller piece of ribbon used in the same manner, on top.
Scrunch the ribbons together in the center and insert into the Bowdabra.
Have fun adding additional embellishments into the Bowdabra!
Scrunch down all of the embellishments using the Bowdabra wand.
Grab the loose ends of the wire and push through the wire loop.
Pull the wire tightly with everything still in the Bowdabra and then take them out, tying the wires around the back into a knot. Attach the embellished Bowdabra bow to the wreath using the wires. Fluff the bows. Also, you can tie a small piece of Bowdabra wire to the top of the wreath as a hanger.
And finally, glue on a tiny pumpkin to the center of the Bowdabra bow to complete a awesome fall look! How’s that for a unique bazaar craft project!
Visit Bowdabra designer Gail on Facebook and her blog Purple hues and me, Pinterest and G+ to see more of her awesome crafts!
