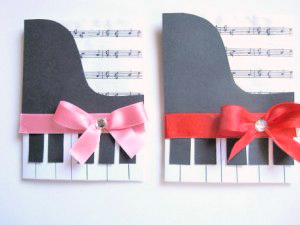
Whether you have a piano recital or party coming up, this piano card would be a perfect addition. Create by using piano 
Materials:
- Mini Bowdabra
- Bowdabra Bow Wire
- Hair Bow Tool & Ruler
- Glue gun/Double Stick tape
- Paper cutter/scissors
- 5/8″ Satin Ribbon
- Piano sheet paper
- Black & white cardstock
- Ruler
- Pen or pencil
Instructions:
1. Gather all of your materials to begin making your piano card. Fold one piece of white cardstock in half and cut with your paper cutter or scissors. Fold one of the pieces in half to make a card.
2. Use your paper cutter and cut a square of the piano paper. Use double stick tape to attach to the front side of the card.
3. Cut a piano shape out of black cardstock. You may need to practice a few times to get the perfect shape. Use double stick tape to attach on top of the piano paper. Cut a piece of ribbon to fit underneath the black shape. Do not tape it down yet.
4. Next, cut out five strips to make the piano keys. Use double stick tape to attach under the ribbon. Use tape or a glue gun to attach the ribbon to the card.
5. With your ruler, draw straight lines to complete the details of the piano.
6. Next, place the Hair Bow Tool & Ruler on the Mini Bowdabra. Cut 18”³ of Bowdabra Bow Wire and fold it in half and place it into the Mini Bowdabra.
7. Place a piece of ribbon onto the Mini Bowdabra with the tail on the left at the 2” mark.
8. Make a loop on each side and point the ends towards the top. Scrunch down with the wand.
9. While the bow is still in the Mini Bowdabra, thread the two loose ends through. Separate the two loose ends of the Bowdabra Bow Wire and bring them around to the back of the bow. Cut the Bowdabra Bow Wire.
10. Glue a gem onto the top of the bow.
11. Glue the bow to the right side of the piano. Make the same card again with different colored ribbon.