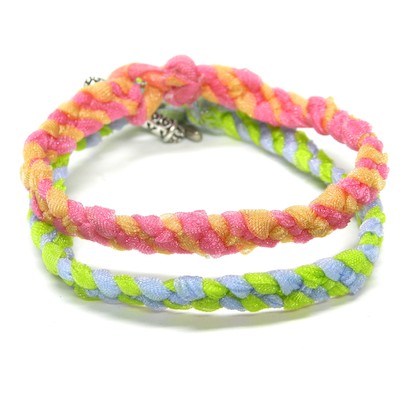
Organza is a sheer ribbon that sparkles and shimmers when braided tightly together. I used the classic 4 strand ribbon bracelet 
Handmade jewelry is a wonderful way to express yourself and show others your creative style.
Materials Needed:
- 7/8″ Organza Sheer Ribbon (2 strands of 30″ for petite bracelet)
- Jump Ring
- Bracelet Clasp
- Lighter
- Hot Glue Gun
- Alligator Clip
- Mini Bowdabra (optional)
Instructions:
1. Begin by cutting two strands of 30″ organza sheer ribbon. For larger bracelets add more ribbon length.
2. Next, fold one of the ribbons in half to create a crease. At the crease mark attach a jump ring.
3. Fold the other ribbon in half to create a crease. At the crease mark line it up underneath the jump ring. Twist the pink ribbon once around the gold ribbon.
4. Twist the ribbon tightly and arrange the ribbon so that the 2 golds are on the top left and right and the two pinks are in the center.
5. Before starting the braid find something to securely hold the ribbon in place. I used an alligator clip and attached it to my Mini Bowdabra that was already sitting on my work table. To begin to braid the ribbon first make sure that the ribbon strands are arranged correctly. Starting on the far left that is ribbon strand 1 (gold), then ribbon strand 2 (pink), ribbon strand 3 (pink), and lastly far right is ribbon strand 4 (gold). Bring ribbon strand 1 (gold) under ribbon strand 2 (pink).
6. Next, braid ribbon strand 4 (gold) over ribbon strand 3 (pink). You should now have two gold strands in the center.
7. Next, take the ribbon strand in the 2 position (gold) and braid it over the ribbon in the 3rd position (gold).
8. Continue braiding the sheer ribbon. Starting at the left – braid ribbon 1 under ribbon strand 2, then braid ribbon strand 4 over ribbon strand 3, and lastly braid ribbon strand 2 over ribbon strand 3. Just remember left under, right over, and left-middle over. So that the ribbon doesn’t twist and turn move the alligator clip farther down the braid as you go.
9. Braid until you have achieved your desired bracelet length. Finish with two of the same colors on the inside.
10. Twist the two left strands together and the two right strands together.
11. Remove the bracelet from the Mini Bowdabra. Form a small loop with the twisted ribbon and hold it in place with the alligator clip.
12. Bring the other twisted ribbon strands around the loop and hold them in place with a slip knot.
13. Trim away ribbon strands and seal the ends with a lighter to keep them from fraying. Add a small dab of glue to the ends to keep the slip knot from pulling out.
14. Decide how you would like to finish your bracelet. You could attach the jump ring to the ribbon loop or you could add a finishing clasp. I chose to add a clasp that will slip right through my ribbon loop and hold the bracelet in place.
15. Make several of these fun and colorful bracelets.