Learn how to make a Bottle Cap Pet I.D. for either your cat or dog. Bottle caps are a fun craft material to use for all sorts of 
Materials:
- Craft Colored Bottle Caps
- Clear Adhesive Epoxy Domes
- Craft Glue Dots or Tacky Glue
- Cuttlebug or Hammer, Cloth, & Wood
- Solid Colored Cardstock
- Fine Tip Sharpie
- Mini Bowdabra
- Hair Bow Tool & Ruler
- Bowdabra Bow Wire
- Curling Ribbon
- Lanyard and/or Jump Rings
Instructions:
1. Begin with craft bottle caps. I decided to make a few tags so I chose several fun colors.
2. Next, the bottle caps have to be flattened. To flatten my bottle caps I prefer to use my Cuttlebug. When using the Cuttlebug I place the bottle cap face up on plate A. Then I stack 2 B plates on top of the bottle cap and crank it through. If you don’t have a Cuttlebug, the bottle caps can be also be flattened using a hammer. Place the bottle cap on a piece of wood, cover the bottle cap with a piece of cloth, place another piece of wood on top, and hammer.
3. I flattened all three bottle caps with the Cuttlebug. I drilled a hole in one of the bottle caps and attached a jump ring. However, I realize that not everyone may have access to a drill with small drill bits so I came up with an alternative method for the other two.
4. Don’t have access to a drill? Why not use some of the left over Bowdabra Bow Wire to make a hanger? Using the leftover Bowdabra Wire fold it in half and knot to create a small loop. Hot glue the knot into the metal crease of the cap, as well as hot gluing the ends to the cap.
5. Using scrapbooking paper cut circles to fit into the bottle caps add the pet id information.
6. Place the circle scrapbooking paper onto the epoxy domes and use Glue Dots or tacky glue to hold it together on the caps.
7. Add small curling ribbon bows onto the bottle caps. Begin by placing the metric side of the Hair Bow Tool & Ruler onto the Mini Bowdabra. Cut 10″ of curling ribbon and place it into the Mini Bowdabra. Fold the ends of the curling ribbon under the Mini Bowdabra.
8. Cut 8″ of curling ribbon then cut the ends of the ribbon at an angle. Fold the ribbon in half to create a crease. Place the ribbon at the crease mark into the Mini Bowdabra.
9. Fold the curling ribbon at the 1.5cm mark to create a loop with the tail up.
10. Fold th
e ribbon at the 1.5cm on the other side with the tail facing up above the loop.
11. Fold each tail at the 1. 5cm to create two more loops.
12. Scrunch down with the Mini Bowdabra wand.
13. While the bow is still in the Mini Bowdabra, tie the curling ribbon together.
14. Pull the curling ribbon tightly while the bow is still in the Mini Bowdabra.
15. Gently pull the bow out of the Mini Bowdabra and tie the back of the bow with the curling ribbon.
16. Trim away excess curling ribbon and fluff bow.
17. Attach the bow and hot glue the bow into the crease of the bottle cap.
18. Attach a jump ring or lanyard hook from the bottle cap pet id to the dog collar.
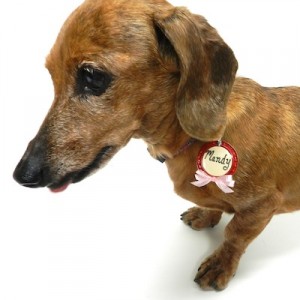
19. Here is my little Mandy rocking and posing with her new bottle cap pet id tag. For taking pictures I used a lanyard hook but for her to wear it normally it will be attached with a jump ring so that it doesn’t dangle too long.
**These are decorative bottle cap pet ids. Please make sure all the parts are glued securely, there are no sharp edges, and that the bottle cap id is attached securely to the collar.
