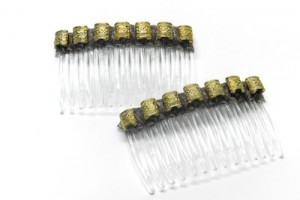
Design formal hair combs using Morex’s Ribbon-to-Bead. The Ribbon-to-Bead has a wire threader attached to the end
Materials Needed:
- Hair Combs 2.75″
- Large Eyed Beads
- Sheer Leopard Print Ribbon-to-Bead
Instructions:
1. Begin with a 2.75″ plastic comb. Completely unroll the Ribbon-to-Bead from the spool. Tie the end of the ribbon around the first comb prong. Leave a small tail.
2. Next, begin to wrap the ribbon around the top of the comb in-between each comb prong. Fold the tail to the back of the comb and cover it with the wrapped ribbon.
3. Wrap the ribbon all the way to the end of the comb.
4. Next, wrap the ribbon around the comb prong at the end and back around the top of the comb.
5. Continue wrapping the ribbon around each comb prong and then around the top of the comb. Wrap till you reach the other end. Wrap a final loop around the last comb prong to cover the beginning knot.
6. Next, thread a large eyed bead onto the Ribbon-to-Bead threader.
7. Thread the beads onto the ribbon. Position the bead onto the top of the comb and wrap the ribbon around. Continue wrapping and threading beads. I used larger style beads so I skipped every other comb prong – though I did wrap ribbon between each comb prong.
8. Keep adding beads all the way to the end of the comb.
9. Once you reach the end of the comb wrap the ribbon between the beads back to the other side. This helps to keep everything tight and in place.
10. Using the wire threader, thread the ribbon underneath the last several loops of ribbon on the back of the comb. This will hide your ribbon end and hold it all in place.
11. Cut the ribbon from the spool. Seal the end of the ribbon with either clear nail polish or a lighter.
12. Following the directions to make another hair comb for a matching set.
13. Your DIY formal hair combs are complete and ready to be worn!
