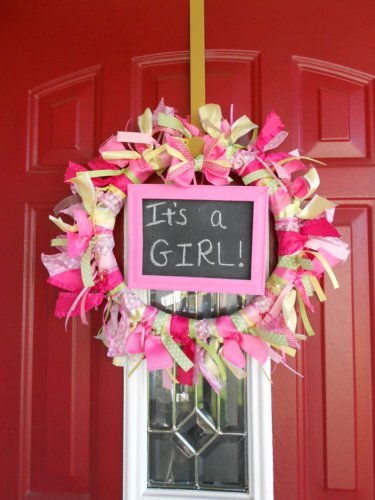
Let your guests know they’re in the right place with this super fun chalk board ribbon wreath! Not only does this 
Materials:
- 6-7 Coordinating Spools of Ribbon in Various Sizes
- Medium Size Wreath
- 5″ x 7″ Picture Frame
- Chalk Board Spray Paint
- Mini Bowdabra
- Mini Bowdabra Hair Bow & Tool Ruler
- Bowdabra Bow Wire
- 1 1/2 ” Pink Grosgrain Ribbon Cut 22″, diagonal cut
- 2 5″ pieces of 1″ Green Polka Dot Grosgrain, diagonal cut
- 1 6″ piece of 1″ Green Polka Dot Grosgrain
- 2 4″ pieces of 1/4″ Yellow Grosgrain, diagonal cut
- 2 4″ pieces of 1/4″ Pink Polka Dot Grosgrain, diagonal cut
- Alligator Clip
- Hot Glue & Gun
Instructions:
1. Start by cutting your ribbon into 6″ pieces. Tie double knots around the entire wreath until it’s completely covered. There’s no order to this, just fill it up. You can use a wicker or foam wreath. I purchased this one at the dollar store.
2. Grab your picture frame. I used a 5 x 7 frame. Also purchased from the dollar store.
3. Remove the frames backing and glass. Get rid of the glass.
4. Go to a well ventilated area and spray paint the frame backing with the chalk board paint. Follow the directions on the paint can. I sprayed two coats of the chalk board paint, then waited 24 hours to write on it.
5. Once completely dry place your frame backing back in the frame. Slip a longer piece of ribbon through the hardware on the back.
6. Tie the ribbon around the wreath. Trim off the excess.
7. Gather all the materials for the hair bow. Place Bowdabra ® Hair Bow Tool and Ruler onto the Mini Bowdabra, leaving a space at the bottom for the Mini Bowdabra tower to move. Cut a 18” piece of Bowdabra Bow Wire and fold it in half. Lay it into the Mini Bowdabra. You’ll have a loop at one end and two loose pieces at the opposite end
8. Place the two 5″ pieces of green polka dot grosgrain in the Mini Bowdabra.
9. Fold the 22″ pink grosgrain ribbon in half to find the center point. Make a crease in the center. Place the ribbon at the crease mark down into the center of the Mini Bowdabra.
10. Grab one end of the ribbon and crease the ribbon into the Mini Bowdabra leaving a two inch tail, pointing down.
11. Grab the ribbon on the other side of the Mini Bowdabra tower. Fold over the first ribbon loop and down into the center of the Mini Bowdabra, leaving a two inch tail, pointing up. The two ribbons will form an X on the top of the Mini Bowdabra towers.
12. Using the Hair Bow Tool and Ruler as your guide position all four loops evenly and symmetrically. Start with the bottom loop and make a crease in the center and press into the Mini Bowdabra.
13. Then take the top loop and make a crease in the center of it, as well, press into the Mini Bowdabra. Scrunch down the ribbon with the Mini Bowdabra Wand.
14. Place the two 4″ pieces of yellow grosgrain in the Mini Bowdabra.
15. Next place the two 4″ pieces of pink polka dot grosgrain ribbon in the Mini Bowdabra.
16. Use the Mini Bowdabra wand to scrunch it down.
17. While the bow is still in the Mini Bowdabra, thread the two loose ends of the Mini Bowdabra Bow Wire through the loop at the other end.
18. Gently pull the bow out of the Mini Bowdabra. Separate the two loose ends of the Bowdabra Bow Wire and bring them around to the back of the bow and knot. Trim off the excess.
19. Use your 6″ piece of green polka dot grosgrain to tie a knot around the bow.
20. Use your hot glue to attach the alligator clip.
21. Use the alligator clip to attach the bow to the wreath.
22. Your Chalk Board Ribbon Wreath is ready to be hung!
23. Or hang in the baby’s bedroom as a personalized wreath.