Use ribbon to create a custom Easter basket that will stand out from the rest. In less than 30 minutes you will have a 
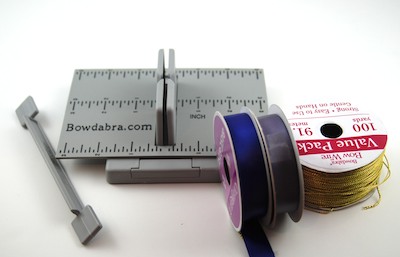
Supplies:
Mini Bowdabra
Bowdabra Bow Wire
Hair Bow Tool & Ruler
¾” wide satin purple ribbon
¾” wide satin light purple ribbon
Easter Basket
Additional ¾” wide satin ribbon for wrapping around basket
Instructions:
1. Begin by gathering all the materials you will need for this project.
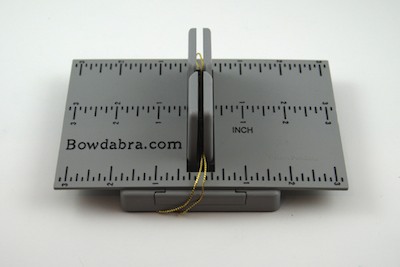
2. Place Bowdabra ® Hair Bow Tool and Ruler onto the Mini Bowdabra, leaving a space at the bottom for the Mini Bowdabra tower to move. Cut a 18” piece of Bowdabra Bow Wire and fold it in half. Lay it into the Mini Bowdabra. You’ll have a loop at one end and two loose pieces at the opposite end.
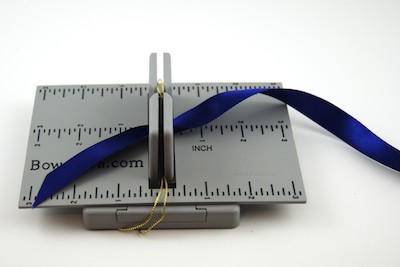
3.Place the ribbon in the Bowdabra ® Hair Bow Tool and Ruler onto the Mini Bowdabra. The edge of the ribbon should reach the left hand side.
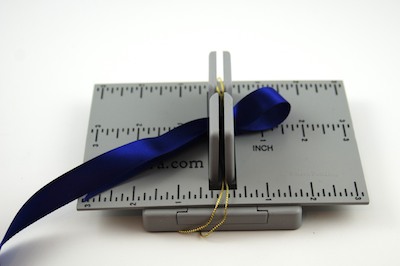
4. Depending on how large you would like your hair bow to be is where you place your first loops. To make your first loop, fold and make a crease into the ribbon and press into the Mini Bowdabra.
5. Next, fold the other side at the same width. Ribbon tails should be right side down below your loops.
6. Cut the ribbon off the roll.
7. Next, we are going to layer and make the same bow but with the light purple ribbon. We will repeat step 3 above: Place the ribbon in the Bowdabra ® Hair Bow Tool and Ruler onto the Mini Bowdabra. The edge of the ribbon should reach the left hand side.
8. Match the size of your bow loop with the bottom dark purple loop. To make your first loop, fold and make a crease into the ribbon and press into the Mini Bowdabra.
9. Next, fold the other side at the same width. Ribbon tails should be right side down below your loops.
10. Cut the excess ribbon off the spool. Scrunch down with Mini Bowdabra Wand.
11. While the bow is still in the Mini Bowdabra, thread the two loose ends of the Bowdabra Bow Wire through the loop at the other end.
12. Pull the Bowdabra Bow Wire tightly while the bow is still in the Mini Bowdabra.
13. Gently pull the bow out of the Mini Bowdabra. Separate the two loose ends of the Bowdabra Bow Wire and bring them around to the back of the bow and knot.
14. Your bows are now ready to be placed on your Easter basket.
15. Take 2 spools of coordinating ribbon and tie a knot around the one end of the basket handle.
This is how it should look like:
16. Begin twisting the ribbon to form a pattern of your liking. You could also braid the ribbon as well.
17. Begin twisting the ribbon around the basket handle.
18. Once you reach the end tie a knot and either cut the ribbon or tuck it inside the basket.
19. Attach a bow on each side of the basket.
20. Fill with Easter treats!
For more about the designer of this tutorial click here…..
Post 17 – Of our National Craft Month Celebration of the Many Uses of Ribbon Giveaway
There are multiple ways to enter our month long giveaway:
The ways to enter the giveaway with this post are the following: (4 entries per person for this post)
(1 entry) Click the Pin It button at the bottom of this post. Please mark the pin with @bowdabra so that we can easily find it in a search. Please leave a comment below that you pinned it along with your Pinterest name. We would love to follow your boards!
(1 entry) Leave a comment below about the tutorial.
(1 entry) Tweet about the @Bowdabra tutorial on twitter. Leave a comment below.
(1 entry) Get Daily Bowdabra Blog Updates. Enter your email address in the field on the right side bar and get an email every time we add a new tutorial. Leave a comment below that you signed up for our daily updates.
Additional Entries:
Visit our Bowdabra Friend and Featured Blogger Katie of SewWoodsy. She is celebrating the many uses of ribbon with a Ribbon-to-Bead Necklace! Head on over to her blog for additional entries into our Bowdabra National Craft Month Giveaway.
Join us for Bowdabra’s National Craft Month celebration for lots of great ways to enter in our month long giveaway. Contest begins March 1, 2012 and ends March 31, 2012 at midnight eastern time. Winners to be announce April 2, 2012 at https://bowdabra.wpengine.com
Prize Packages:
- Grand Prize ”“ Ribbon totaling in value of $150.00
- 2nd Prize ”“ Bowdabra, Mini Bowdabra, and Hair Bow Tool & Ruler Suggested Retail: $41.54
- 3rd Prize ”“ Mini Bowdabra and Hair Bow Tool & Ruler Suggested Retail: $24.11
**Each blog post brings more entries into our month long contest. Visit our National Craft Month Giveaway Page for a list of all the posts (each day a new post is added to the list), contest rules, and contest help.
NO PURCHASE NECESSARY TO ENTER OR WIN. VOID WHERE PROHIBITED. VALID IN THE 50 UNITED STATES AND THE DISTRICT OF COLUMBIA ONLY. ENTRY IN THIS CONTEST CONSTITUTES YOUR ACCEPTANCE OF THESE OFFICIAL RULES.


